Monday, November 30, 2015

Press Release: Zoya Mystery Box Cyber Monday Deal!

Hey y'all! I have a press release for you today from Zoya! I've already ordered mine! 


Get ready… our Super Cyber Monday Holiday Deal is a

… (insert drumroll)… MYSTERY BOX!

           
THE MYSTERY BOX IS BACK!
If you love surprises, the MYSTERY BOX deal is for you - you'll get a box filled with some of our favorite products ($72 value) for just $20 plus free shipping! Surprise yourself or someone else with a great deal AND great products!


Wondering if it’s worth the gamble? Last year the Mystery Box was a huge hit – make sure not to miss out on this one day only offer. We promise, it won’t be the same as last year, it will be better!

Here a few blog reviews from last year…nouveau cheapmodel citypolished with pizzazz. As you can see the box was loaded with Zoya and Qtica goodies!


MYSTERY BOX available exclusively on ZOYA.COM
CYBER MONDAY ONLY (11/30/15).


Want to see more? Click below to connect with me!

Friday, November 27, 2015

Nail Art: Textured Peppermint Winter Nails!


Hey y'all! Today on the blog I have some wintery/Christmassy nail art to share with you! I was really in the mood to use some textured polishes but I wasn't sure which colors or art to do with them. I am actually a huge fan of textured polishes and the PixieDust line is what got me started on Zoya polishes. My first textured polish was Zoya Tomoko and I haven't looked back since! I also really love the OPI Liquid Sands so I pulled out OPI Solitaire and Zoya Oswin for this peppermint/candy cane look. I have some more pictures to share with you and a short step by step on how I completed this mani! 


I started by applying my favorite base coat to protect my natural nails - I use LynBDesigns B-Stronger. Once that was dry, I painted two coats of OPI Solitaire on my thumb, ring finger, and pinkie. I went back with Zoya Oswin after my base color had dried and added the two tiny dots with my smallest dotting tool. I did topcoat with LynBDesigns B-Shiny but only one coat to preserve the texture of the polishes. I mostly added the topcoat to prolong wear. Starting on my middle finger, I used a thin striping brush to add OPI Solitare closest to my cuticle and at an angle. I cleaned off my striping brush and did the same thing with Zoya Oswin. I repeated back and forth, cleaning my brush between each color until I reached the tip of my nail. Once the lines were dry, I went back with the same striping brush and cleaned up my lines a little and intensified each of the colors. I allowed my design to dry and topcoated, again only using one layer of topcoat to preserve the texture of the polishes. And that's it! Super easy and very few tools required for this look. 

Macro of my middle finger 
Macro showing the designs on my middle finger and ring finger

That's it for this nail art look, what do you think? What's your favorite winter/Christmassy design to do?

Thanks for reading!

Want to see more? Click below to connect with me!


Wednesday, November 25, 2015

Indie Spotlight Series: Meet The Maker of Message Beauty!

Hey y'all! Today on the blog I have this month's Indie Spotlight Series to share with you! November's spotlight is Message Beauty, a newer indie to our nail world. She makes nail and hand care items but her specialty, in my opinion is her acetone tonic. I reviewed it last month, you can read that HERE. Are you guys ready to get to know the maker of Message Beauty? She dropped us a line, let's jump in!

~~~~~~~~~~~~~~~~~~~~~~~~~~~~~~~~~~~~~~~~~~~~~~~~~~~~~~~~~~~~~~~~~~~~

Pish: What inspired you to start Message Beauty?

Message Beauty: I love making things for myself, but as most things in my life, my little family of 3 couldn't use enough of the products I was making to be efficient. I hate waste! It feels wrong to me. I started thinking about selling my excess product and really took off from there.

Pish: How do you decide what to do for future products?

Message Beauty: I see inspiration everywhere I go! I take screenshots of images I like, I save articles I read about the healing properties of a certain product. Then I take what I already have. What I already know, and think "How can I incorporate this?"  "Can I make this, into this", or "Can I do something clever to improve this".  I've honestly been trying to pace myself. I have so many more ideas that I can not wait to try out!


Pish: What goes into the testing/prototype phase?

Message Beauty: Out of every batch, I leave product in different settings. One goes in the fridge, one goes on the porch, one in the garage, one on the counter in my kitchen and one in the damp, humid bathroom. And then I let them sit. I want to know how long they'll stay fresh, how long they'll retain their scent, how well they transport, any pigmentation issues. In the beginning, I test out all of my products on myself. I am anal about mixing products. I do tons of research before I even mix two new ingredients. I research, research and research some more. I consult with different professionals (including an aromatherapist) so I feel very confident in their safety before I use them. But having myself as the guinea pig is the best solution. After I'm pleased with their testing results, I share the product with testers. I always ask for their honest opinions. I can't improve things without constructive criticism. I am not above tweaking existing product to make it better, or even tearing it down to it's base and starting over.

Pish: How do you decide on scents?

Message Beauty: There are so many out there! I start with what I love honestly lol. I always try and add one or two outside of my comfort zone to be inclusive of different tastes. And of course there are seasonal scents.  Margarita and Sunscreen might be taking a nap until next summer shortly.  I'm constantly smelling my favorite products and thinking, "What about this do I love?", pull out my favorite part and try and improve it. There are so many options out there, but I kind of want to buy them all. Kind of like my obsessive nail polish collecting. Now I'm browsing my suppliers websites thinking "Shut up and take my money!"

Pish: What do you think will make Message Beauty a success?

Message Beauty: Honestly, my customers.  It's my job to make great products and I'm hoping to find my own little niche but it would be futile without all that my customers do. Social media is such a weapon these days, especially in an over saturated market. I do my part. Run a professional business, make great products and give responsive customer service but that is to be expected of any business!  It's you that makes the difference. It's you taking a picture of your haul, or highlighting what you think is cute packaging or a nice finishing touch. It's you talking about your love for a product. It's you that misses a restock but shares it anyway. You are our voice.

Pish: I know you work by day and make your products by night. What drives you to keep going with Message Beauty?

Message Beauty: Have I mentioned I want to buy all the things to make products? Joking aside, I do LOVE making new products. It's a great creative outlet for me. It is incredibly fun. I specifically kept the brand name vague, because I have so many ways to expand. I wanted to business to be able to grow and mature with me.

But the best part is seeing product make it to it's new home. Seeing the customers using them and loving them. That gives me so much joy. That has always been a part of my personality. Luckily, I only work part time so that gives me plenty of time to work here.  I guess technically I work outside of the home part time, at home part time and as a mom full time. Those are all a luxury and I am very thankful for that. If it ever gets to a point where Message expands, I can easily step aside from the outside of the house job, no strings attached.

Pish: Can you show us some behind the scenes/testing areas for Message Beauty?

Mixing acetone tonic!
New supplies!

Liquid storage!
So that's it for this month's Indie Spotlight Series featuring Message Beauty. If you haven't tried her acetone tonic yet, I highly recommend it! It turns your acetone into a useful tool that won't dry out your nails and it leaves behind a yummy scent! You can find all of her products HERE. She's launching some new seasonal products tomorrow as well as her Black Friday sale! Use code FreeShip for free US shipping on orders over $20 and FreeShipInt for free shipping on international orders over $30! The time to buy acetone tonics is definitely tomorrow as well as she will be offering a 50% off coupon if you buy 3 or more, use code TonicBF. Make sure you add them separately and not the 3/$10 option at checkout!

Thanks for reading!

Want to see more? Click below to connect with me!

Sunday, November 22, 2015

Swatch And Review: 'Twas The Night Trio by LynBDesigns!'

'Twas The Night Trio 
Hey y'all! Today on the blog I have some new polishes from LynBDesigns to share with you! She's releasing a winter trio called 'Twas The Night with names drawn from the book - 'Twas The Night Before Christmas. Each polish is aptly named for what it represents from the book and is perfect for winter and Christmas! Let's jump right in to the swatches!


New Fallen Snow is a gorgeous white polish filled with iridescent white flakies, flashes of purple micro flakies and scattered holo. It perfectly fits the name she has given it as it looks like a fresh blanket of snow in the morning sun. The formula was a bit thick on this one since its filled with so many flakies, but it applies nicely and self levels well. My swatch shows 3 coats plus B-Shiny topcoat. My macro shot really showcases the delicate and gorgeous nature of this beauty!

New Fallen Snow in direct artificial lighting
Fresh Fallen Snow in indirect artificial lighting
New Fallen Snow Macro
Long Winters Nap is a steely blue scattered holo polish with iridescent flakies running throughout. This one is named for the portion of the book where the father says "mama in her kerchief and I in my cap, had just settled down for a long winter's nap." Being a mother of two boys, I am always game for a long nap, especially since the weather has turned colder! The formula is flawless on Long Winter's Nap and my swatch shows 2 coats plus B-Shiny topcoat.

Long Winter's Nap in direct artificial lighting
Long Winter's Nap in indirect artificial lighting
Macro of Long Winter's Nap 
Tarnished With Ashes And Soot is a dusty, deep purple scattered holo with iridescent micro flakies throughout. This color is so unique and the flakies really step it up to the next level! Named for the portion of the book that describes Santa's appearance after coming down the chimney, the finish of this polish definitely reminds me of a recently extinguished fire in the fireplace that's covered in ashes and soot. I have nothing bad to say about the formula, it was smooth and easy to apply. My swatch shows 2 coats plus B-Shiny topcoat.

Tarnished With Ashes And Soot in direct artificial lighting 
Tarnished With Ashes And Soot in indirect artificial lighting 
Macro of Tarnished with Ashes And Soot
That wraps up the swatches of the 'Twas The Night Trio from LynBDesigns - so now you're probably wondering how you can get them! This trio launches on Wednesday, November 25th at 7pm EST at www.etsy.lynbdesigns.com and even better news - she's going to be having a sale for Black Friday that starts on Wednesday as well! The code is TURKEYDAY and it will get you 50% off. I don't know about you guys, but I'm definitely going to be doing some shopping. You can also follow LynBDesigns on Instagram for more information on upcoming releases and sales.

Which one is your favorite? Did you read 'Twas The Night Before Christmas as a child?

Thanks for reading!

Want to see more? Click below to connect with me!

Wednesday, November 18, 2015

Swatch and Review: Madam Glam (Black Friday Discount!)


Hey y'all! Today on the blog I have more polishes from Madam Glam to share with you! And a discount code that they graciously offered my readers for Black Friday! I am happy to report that these polishes are all amazing quality and total must haves. If you want to see the swatches, keep reading! 


The first polish I have to share with you is Holo Fever, a purple based jelly glitter bomb filled with scattered holo micro glitter! Application was lovely despite the slight thickness due to all of the glitter. I applied Holo Fever in two thin coats plus topcoat. I would recommend maybe doubling up on your coats of topcoat because the micro glitter tends to eat it a bit. The formula is a tiny bit on the thick side but self levels beautifully. My swatch shows two coats.

Brush shot of Holo Fever
Holo Fever in indirect artificial lighting  
Holo Fever in direct artificial lighting 
Holo Fever Macro 
The next one of the bunch is More Diamonds Please, a pinky-grey micro glitter filled with scattered holo in a jelly base. The formula on More Diamonds Please is very similar to Holo Fever, a bit thick but easy to apply and it self leveled nicely. I expected to have to do 3 coats of More Diamonds Please but 2 did the trick! My swatch shows 2 coats plus topcoat. 

Brush shot of More Diamonds Please
More Diamonds Please in indirect artificial lighting
More Diamonds Please in direct artificial lighting
More Diamonds Please Macro
Next up is Blue Princess, a blue micro glitter with a slight green shift resulting in a beautiful turquoise finish. Blue Princess was more sheer coverage than the previous micro glitters that I swatched so it could easily be worn as a topper or by itself in 3 thin coats. Formula was similar to Holo Fever and More Diamonds Please, a little on the thick side due to the dense glitter but again, it self leveled nicely. My swatch shows 3 thin coats plus topcoat. I did dab the glitter around a little around the tip of my nail to make sure I didn't have any VNL. 
Brush shot of Blue Princess
Blue Princess in indirect artificial lighting  
Blue Princess in direct artificial lighting
Blue Princess Macro 
The final polish I have to show you is Fun In A Bottle, a white crelly base with matte neon hex glitters in all sizes! This one was definitely my favorite since I'm a lover of all the crellies in life. The formula on Fun In A Bottle blew me away - not thick at all or too thin, just the perfect consistency and opaque in 2 coats. My favorite thing about Fun In A Bottle was that I didn't even have to shake it to get all of the different glitters out. There was no settling of the glitter during shipping and I didn't have to fish any out. My swatch shows 2 coats plus topcoat. 

Brush shot of Fun In A Bottle
Fun In A Bottle in indirect artificial lighting
Fun In A Bottle in direct artificial lighting 
Fun In A Bottle Macro 

That rounds out my swatches for Madam Glam this time! If you want to order any of these beauties or some of the others on their site, head over to MadamGlam.com and use the code BFpish at checkout for a Black Friday discount. The discount gives the first 10 readers who order 40% off and everyone else after that 30%! This code is good until the evening of Black Friday (11/27). Don't forget to follow Madam Glam on Instagram for more news and sign up for their newsletter to be updated on other sales. I get emailed newsletters about deals on their website all the time!

Monday, November 16, 2015

Swatch and Review: M Polish Winter 2015 Collection!

Hey y'all! Today on the blog I have the Winter 2015 collection from M Polish to share with you! I was lucky enough to receive these to swatch through Nail Blogger Roundabout and am so excited to show them to you. They're all so super gorgeous, glitzy polishes that are perfect for the holiday season, so let's jump right in! 


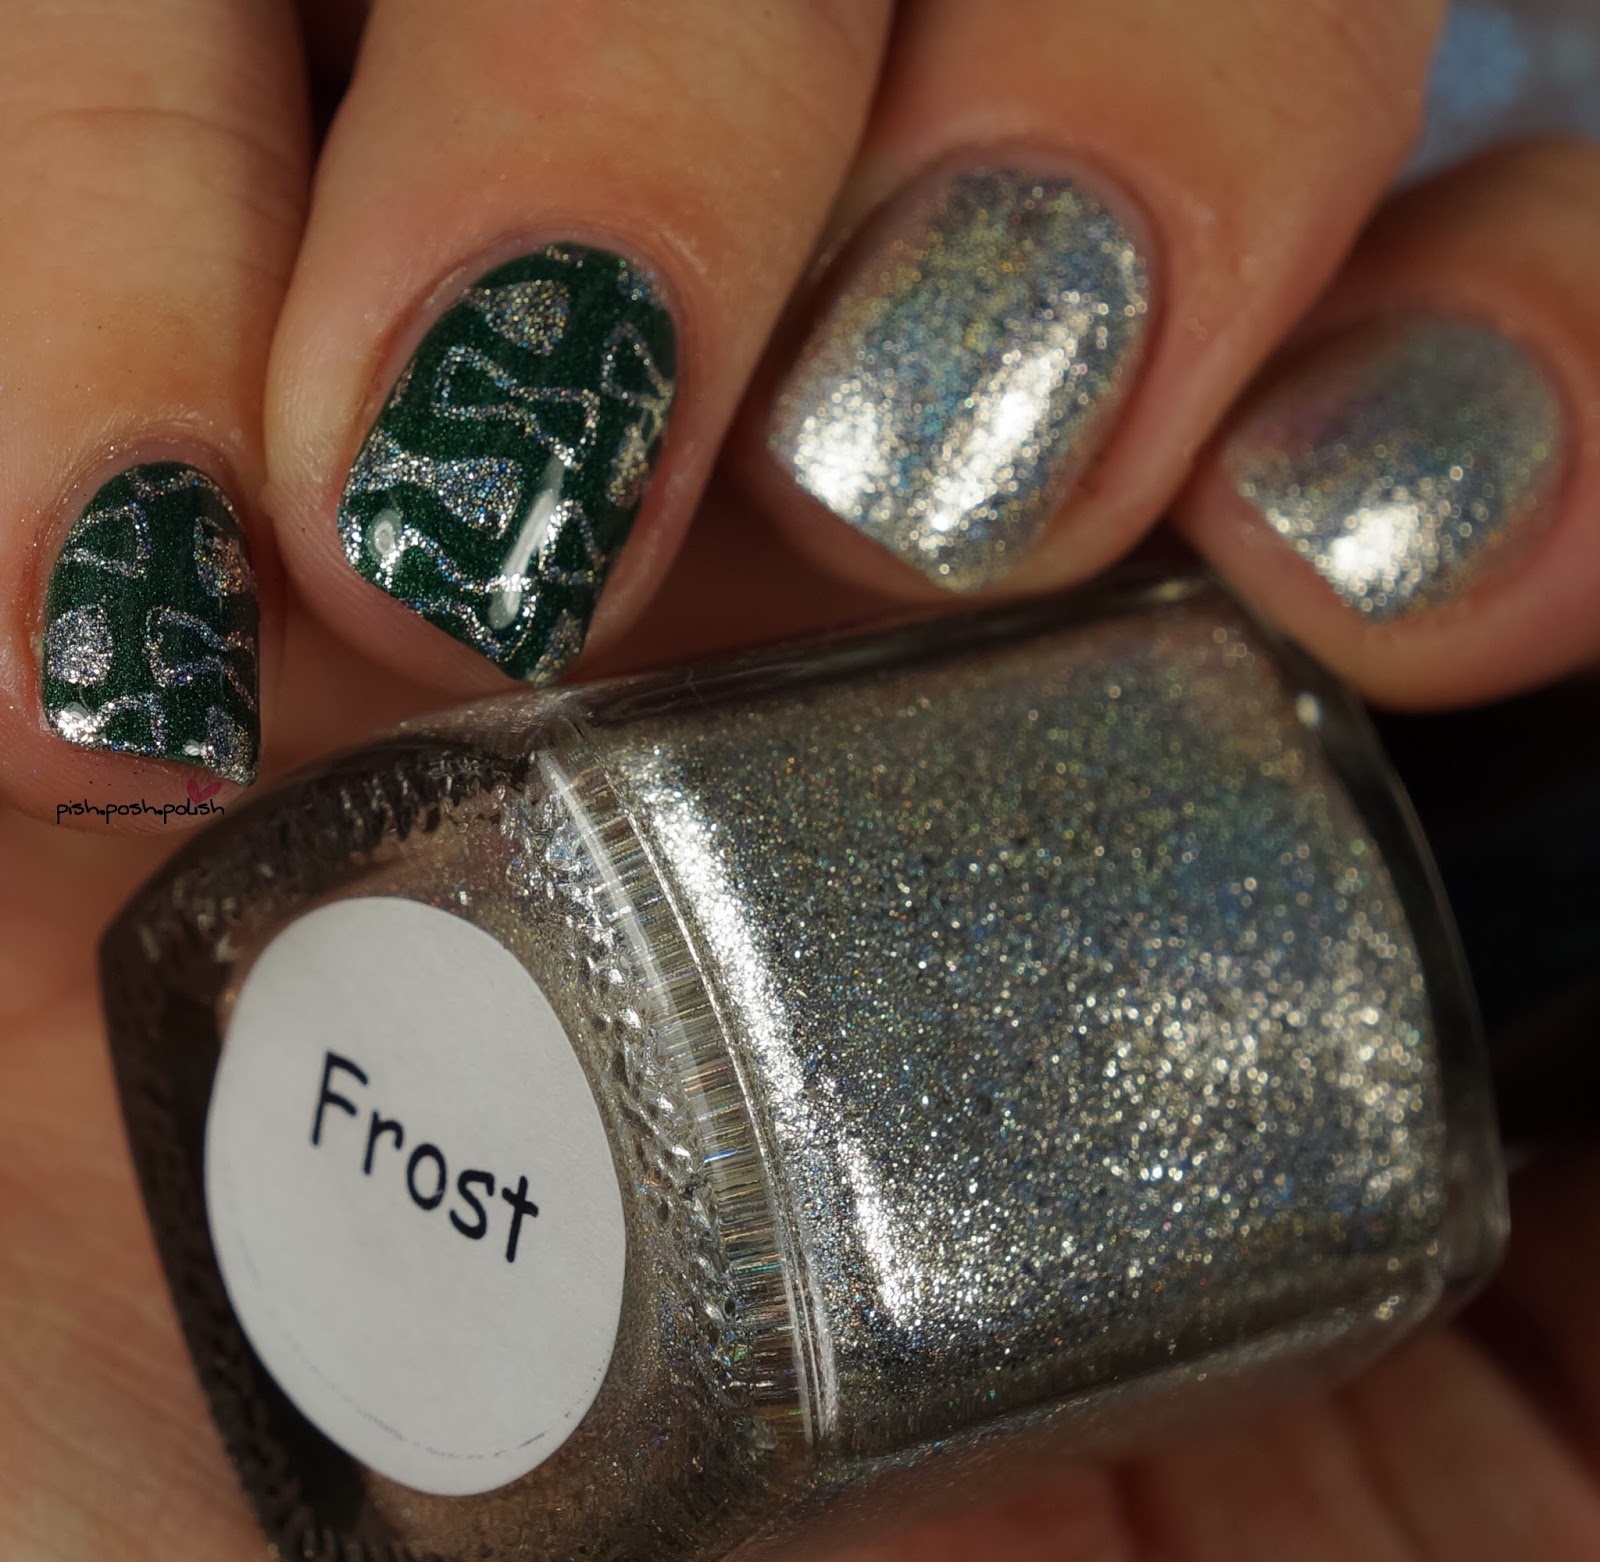
The first one that I swatched from the collection is Frost. Frost is a reflective, antiqued silver foil with holo shimmer throughout. So many finishes in one polish and they all translate to the nail - how amazing is that? One of the best things about the M Polish Winter collection is that although they are primarily stamping polish, they all can be used as regular polish with easy application! I applied Frost here in one easy coat on my index and middle fingers and stamped it over Zoya Verushka. The entire mani is topped with KBShimmer Clearly On Top. Because of the heavy amount of flakies in Frost, it was a little thicker to apply as a full coverage polish but it self leveled easily and the image stamped cleanly using my Creative Shop Stamper and the Cici&Sisi Holiday 2014 plate. 


 The second polish I have to show you is Cranberry. Cranberry is a metallic pink toned purple with scattered holo glitter running throughout! The formula on Cranberry is similar to Frost but without the flakies in it. It applied in one easy coat for a full coverage polish on my index and middle fingers and stamped crisply on my ring and pinkie over Zoya Leah. The entire mani is topcoated with KBShimmer Clearly On Top.


 The next one I have to show you is Figgy, a royal blue toned purple metallic with holo shimmer running throughout. The formula and application on Figgy is identical to Cranberry - easy to apply as a full coverage polish with no brush strokes and the polish picked up and transferred easily using my Creative Shop Stamper. I stamped it here over LynBDesigns Fresh Fallen Snow and topped with Clearly On Top.


 Next up is the blue of the collection, Joy! You guys know how I feel about blue...Be still my heart! Joy is a blue metallic with scattered holo glitter running throughout. I feel like a broken record here but they all have easy formulas for both full coverage wear and for stamping! Joy has an identical formula to Cranberry and Figgy and applied easily with no brush strokes as a full coverage polish and stamped beautifully over KBShimmer In Bare Form using my Creative Shop Stamper.


 What would a Christmassy, wintery collection be without a true gold? Next up I have Bells, a yellow toned reflective gold foil with holo shimmer throughout. Can you even? I can't! I stamped it here over Madam Glam Red-Black. This one was a little thicker for application as a full coverage polish due to the heavy amount of flakies but it self leveled and smoothed over with topcoat. Stamping was a breeze with Bells using my Creative Shop Stamper and the Cici&Sisi Holiday 2014 plate.


Lastly is my second favorite (after Frost!) - Carol! Carol is another beautiful reflective foil with holo shimmer but this time in a coppery shade. Just like Bells and Frost, it was a bit on the thicker side for full coverage application but I only needed one coat and it self leveled well. My images picked up cleanly using my CSS. I stamped it here over Zoya Sailor and topped with KBShimmer Clearly On Top. 


This stunning collection launches TODAY at noon CST at mpolishes.com! The entire collection can be purchased in full size for $60 or mini size for $24. Individually the polishes retail for $10.50 for full size and $4.25 for mini size. You can also follow M Polish on Instagram for more swatches and news on the release! 

Which is your favorite? Are you excited for this collection? 

Thanks for reading!