Hey y'all! Today on the blog I have a product from bornprettystore to share with you. I had never used loose glitter before and have decided recently to try to push myself outside of the box when I'm selecting things to review from BPS. I actually had a lot of fun using these, though I can't say I was very proficient in using them. Haha. If you'd like to hear how I used these, skip past the break.
This mani was actually done a couple of weeks ago in honor of all the babies who went to heaven too soon. October is Pregnancy and Infant Loss Awareness month and many of my close friends have lost littles so I did this mani for them.
I started with a dry white base on my pinkie finger and started adding topcoat just in the places I wanted to place the glitter. I used a tiny dotting tool to place each glitter on my nail, adding more topcoat when it started to get too dry. Once they were all placed down in the ribbon shape, I topcoated once more to seal all the glitter in and thats it! If you'd like to see a live tutorial of this mani, click below to head to my Youtube channel:
If you'd like to pick up a container of these multicolored glitters or any other items, you can use my code PPPQ10 at checkout to receive 10% off your regularly priced items.
Hey y'all! Today on the blog I have six shades from the OPI Starlight Collection to share with you. These polishes were provided to me as a part of the Preen.Me VIP program to swatch for ya'll and to show you some nail art looks that I did with them. Today's post is the swatch portion and I will have some nail art looks for you coming soon, so look for that!
From Preen:
"(The Starlight Collection) is made up of 18 ethereal shades that range from classic to cosmic. This new holiday collection includes everything from subtle shimmer to all-out sparkle."
The first shade that I swatched in my portion of the collection is By The Light Of The Moon, a bright silver metallic polish with silver hex and black micro glitter throughout. Guys, I hate to start off a post negatively but...no. This polish was such a disappointment for me. Its SO BEAUTIFUL in the bottle but definitely doesn't translate to the nail at all. The metallic base is very streaky, easily overworked, and leaves many brush strokes behind in a way similar to OPI Push And Shove. The glitter is completely covered in most places by the metallic base, leaving the finish looking lumpy and uneven, even after more than one coat of topcoat. This is the second time I have seen OPI try to do glitter in a metallic base (Pineapples Have Peelings, Too comes to mind) and it just doesn't work well. My swatch shows two coats plus 2 coats of Seche Vite and words cannot express how much I disliked the way it looked on me.
By The Light Of The Moon in direct artificial lighting
Macro of By The Light Of The Moon
Luckily, the second one I swatched was leaps and bounds better in formula, color, and application. This one is Center Of The You-Niverse, a black base with silver microflakie shimmer running throughout. I think this one will make a great base for nail art - its opaque in two thin coats and has a great payoff with the shimmer. I actually loved the formula on all of these, they were very true to OPI's standard formula and very easy to control on the nail.
Center Of The You-Niverse in direct artificial lighting
Macro of Center Of The You-Niverse
The third polish I swatched is my favorite, this is Cosmo With A Twist. I think it could best be described as a black jelly with iridescent indigo and purple microflakie shimmer throughout. I was quite frustrated that I couldn't get a color accurate photo on this one, my camera kept picking up all of the blue and none of the gorgeous purple but you can see how it really looks in my macro shot. The formula on Cosmo was perfection, two easy thin coats that went on like butter. I don't own a ton of OPI and I always forget how much I love their brush! I can't wait to use this in some nail art!
Cosmo With A Twist in direct artificial lighting
Macro of Cosmo With A Twist
Can we talk about glitter toppers for a second? I hate them, typically. They are never dense enough, they don't lie flat, and they're never as pretty on the nail as they are in the bottle. That is not the case with Infrared-y To Glow! Meet one of the only glitter toppers I might actually ever use! I am not sure what you'd even call the shape of those glitter but they're funky and fun pink and gold metallic glitters mixed with scattered holo glitter. I'm wearing it here in 2 coats over I'm In The Moon For Love. I had no issues with fishing for glitter but the dabbing method worked the best for me to get the large glitter off the brush.
Infrared-y To Glow in direct artificial lighting
Macro of Infrared-y To Glow
Perhaps the biggest disappointment in the collection for me was Press * For Silver. This is a gorgeous antiqued silver metallic polish but GAHHHHH the brush strokes! I saw Jen from +jeninthemorning sponge on the second coat of hers and it eliminated the brush strokes so I just may try that when I get ready to wear it again. This one is shown below in 2 thin coats plus topcoat. The major redeemer for Press * For Silver is that it stamps and I have a nail art look coming up to show that to you.
Press * For Silver in direct artificial lighting
Macro of Press * For Silver
The final polish I have to show you is my second favorite - I'm In The Moon For Love. This one is a beautiful eggplant creme with subtle shimmer running throughout it. This was another one with a typically easily OPI formula and it was a joy to apply. I've also used this one in a nail art look upcoming soon.
I'm In The Moon For Love in direct artificial lighting
Macro of I'm In The Moon For Love
That rounds out my post about 6 of the 18 shades from OPI's Starlight Collection sent to me by Preen.Me. You can find these and the rest of the Starlight Collection from OPI, directly on Preen's site, and wherever OPI is typically sold. Follow Preen on Instagram for more information, swatches, and giveaways! If you'd like to see a live swatch of these 6 polishes, click below to head over to my Youtube channel:
What do you guys think of the OPI Starlight Collection? Will you be picking any up?
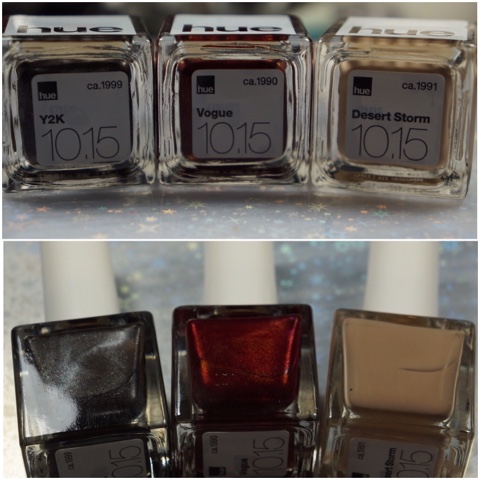
Hey y'all! Today on the blog I have a swatch and review of the October box from Square Hue. If you haven't heard of Square Hue before, its a monthly subscription box that comes with either 3 full sized polishes for $12.99 plus $5 shipping or 2 full sized polishes for $10.99 plus $5 shipping. Each box is centered around a theme but all the polishes are color coordinated with what's seasonally appropriate. October's box is centered around the 1990's and includes three perfectly fall shades. A portion of the proceeds from the sale of each box goes directly to raise awareness for victims of human trafficking via the A21 Campaign.
If you see the photo I included of the box itself, you can see that the box comes with a card that shows the theme of the box, plus all three shade names with a place to swatch them on the card to see the colors. So if you'd like to see swatches of these pretty polishes, skip after the break!
The first polish I swatched in the collection is Desert Storm, a creamy nude shade with yellow undertones. I didn't think I'd love this shade because yellows typically clash with my olive toned skin but this actually turned out to be a love for me! I may have even found my perfect mannequin hand shade which is kind of exciting! (Shit nail polish addicts say!)
Although the color is beautiful and the formula is what I would call good, I struggled with Desert Storm because its a little on the thin side. I had polish run down my brush and flood my cuticles which was frustrating when it made a mess of things. The positives of the formula are that its completely opaque in 2 thin coats, it self levels beautifully, and dried to a glossy finish on its own. I am showing it below in 2 coats plus topcoat.
Desert Storm in direct artificial lighting
Macro of Desert Storm
The second polish from the box that I swatched is called Vogue, a red jelly with silver shimmer throughout. This one was definitely my favorite in terms of color - look how vampy and perfect for fall it is! I can see wearing this one all the way through Christmas. The formula was the same on this one as Desert Storm - opaque in 2 thin coats but the thinness of the polish made it frustrating to apply because it pooled in my cuticles in a couple of spots. It self leveled beautifully and dried to a shiny finish. My swatch shows 2 thin coats plus topcoat.
Vogue in direct artificial lighting
Macro of Vogue
The final polish from the box is called Y2K, a blackened jelly with silver shimmer throughout. I really want to wear this one again and matte it - I have a suspicion that it would look similar to Zoya Dovima from the 2014 Matte Velvet collection! I feel like I'm repeating myself but the formula on this one is identical to the other two - beautifully opaque in 2 thin coats but somewhat thin and runny which led to pooling issues. Because its a darker color, it stained my cuticles where it pooled but it didn't stain my nails after I removed it so that's a bonus! My swatch shows 2 thin coats plus topcoat.
Y2K in direct artificial lighting
Macro of Y2K
Overall thoughts for this box: The colors are beautiful and I love that they all center around one inspiration. There is great value in this box because you get 3 full sized polishes for only $12.99 or 2 full sized for $10.99. Really the only downside is application issues but those may be personal to me as I tend to prefer a slightly thicker polish because I find them easier to control.
If you'd like to get this box or any future boxes, you can find them at squarehue.com and the signup process is super easy! You can also follow them on Instagram for more information. If you'd like to see my live swatch of these polishes, click below to head over to my Youtube channel:
Do you get any nail polish subscription boxes? Which is your favorite?
Thanks for reading!
Want to see more? Click below to connect with me on social media!
Hey y'all! Today on the blog I have a review of some nail wraps from bornprettystore to share with you. I am not a lover of nail wraps because I find them difficult to use and these were no exception to my previous experience. If you are not adept at using nail wraps, you won't like these. I'll get into more after the break.
These wraps came packaged inside a plastic sleeve with a protective plastic cover over them. The came stuck to a cardboard backing and required peeling off, which is pretty standard for nail wraps. A small, coarse nail file comes with them to use to file the excess off at the tip of your nail.
Heres the thing about these wraps - they are entirely too stiff. They aren't malleable at all, they don't stick to your nail or lie flat. I have a slightly different nail shape than "normal" but I felt like they should at least stick to the bed of my nail. As you can see from the photos, the cuticle line is super uneven and couldn't be adjusted in any way except for cutting which is sort of impossible once they're already on your nails. They were so thick and difficult to mold to my nail that I couldn't get the excess to file off my nails so you can see in the pictures that I sort of gave up after working very long and hard to get it off. These were just a major bust for me.
Item #: XF-JU137 from bornprettystore
I really wouldn't recommend these to anyone who is a nail wrap beginner but if you'd like to pick these or any other items up, you can use my code PPPQ10 for 10% off your regularly priced items.
Have you had good luck with nail wraps? Which ones do you like?
Thanks for reading!
Want to see more? Click below to connect with me on social media!
Hey y'all! Today on the blog I have some halloween zombie nails to share with you! This was my first time doing nails that were more "special effects" and I was really happy with how they came out!
I started with a dry base coat of LynBDesigns B-Stronger and started applying a DIY homemade black jelly to my nails. I intentionally dirtied the underneath side of my nails so that they looked more gross. After the black jelly was partially dried, I went back with a coat of Revlon Holographic Pearls and allowed it to mostly dry. I added another coat of the black jelly and then topcoat with Seche Vite. Once my polish layers were starting to get tacky, I went in with my metal cuticle pusher and started gouging out different "wounds" into my nails. Once I was happy with the gouges in my polish, I went back with FormulaX Boundless Berry to fill in the wounds and then went back and messed the red up with the metal cuticle pusher and then allowed it to dry. I did not topcoat again because I wanted it to be really bumpy and uneven.
To add the gangrenous look around my nails, I used the matte black from my Urban Decay Naked 2 palette and Slowburn from the Urban Decay Electric pallet and dusted them around my nails with an angled eyeshadow brush. And that's it! If you'd like to see a live tutorial, click below to head over to my Youtube channel:
What do you think about these special effects zombie nails?
Thanks for reading!
Want to see more? Click below to find me on social media!