Showing posts with label indie nail art. Show all posts

Wednesday, October 7, 2015

Nail Art: Green Fall Florals!


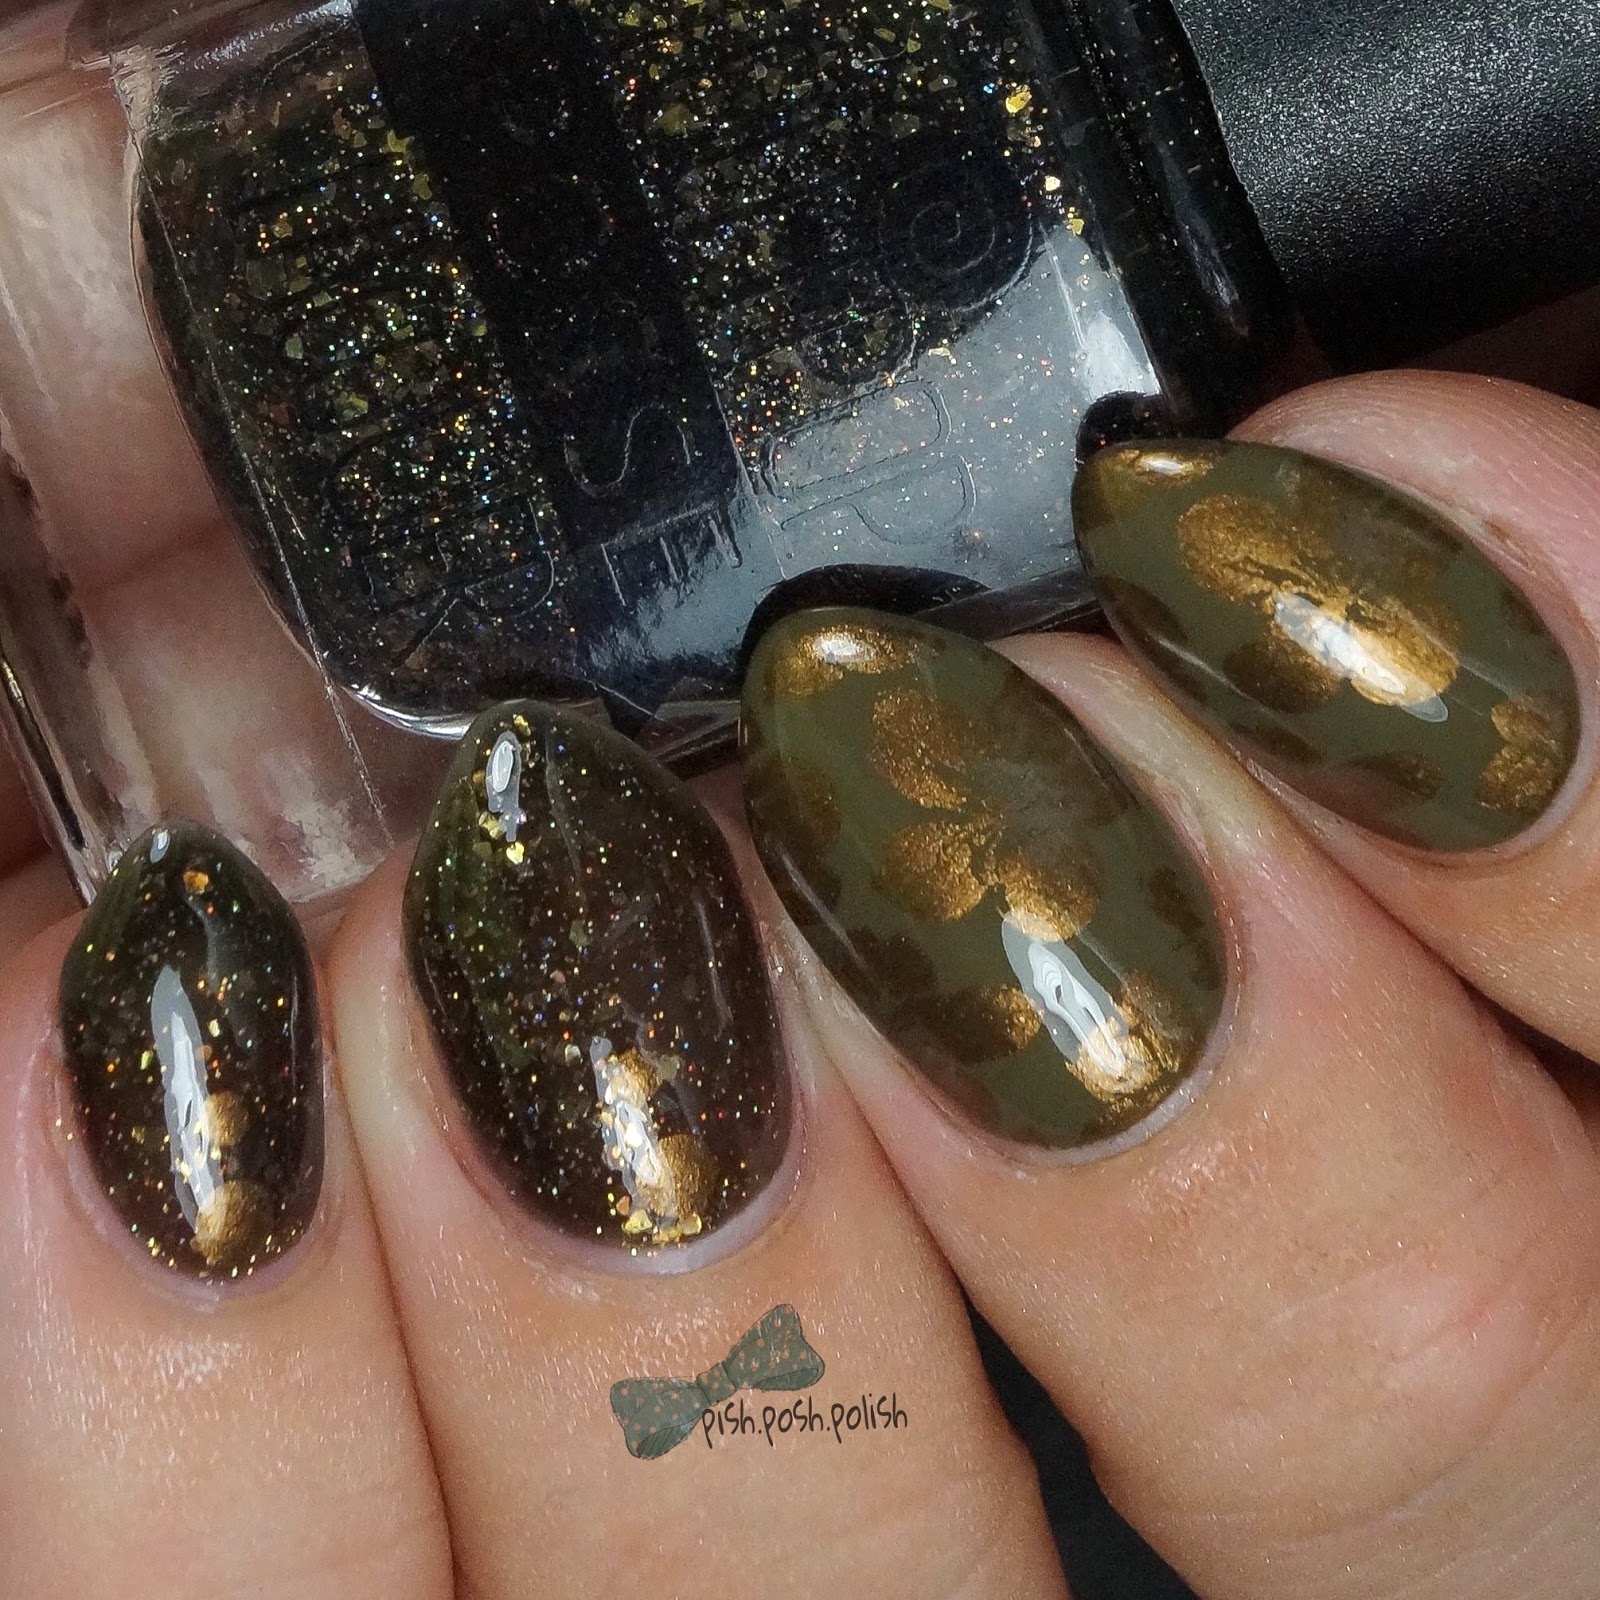
Hey y'all!Today on the blog I am sharing some more fall nail art with you. This time using deep, rich greens with a hint of sparkle.

I started with a base of Nail Envy to strengthen and protect my natural nails. Once that was dry, I went in with Sally Hansen Loden Green, from the Complete Salon Manicure line on my index and middle. Now, this color is a love it or hate it kind of color but I'm in the love it camp so I based this entire mani around it. Anyway, then I used Lollipop Posse Lacquer Inside My Head on my ring and pinkie fingers to give it some bling and sparkle. I am head over heels for Inside My Head - its a blackened green jelly base with scattered holo micro glitter and dark gold flakies all throughout it. STUNNING! Once my base colors were dry, I stamped Loden Green with M Polish Elizabethan and Uber Chic Beauty 4-03. I had considered doing leaves but that is very popular right now so I switched it up and went floral. I added a couple of dots on my ring and pinkie, also with Elizabethan. I sealed everything in with Essie Gel Setter and I wore this mani for 3 full days!

I was going to do a full review of Essie Gel Setter but I never wear my manis long enough to say whether its wear time is actually longer or not. Perhaps I can do it on my cindy hand? Would you want to read a review on it?

If you want to see a live version of this tutorial, click below to go to my Youtube channel!


What do you think of this mani? Do you like the "ugly" pretty colors?

Thanks for reading!


Want to see more? Click below to connect with me! 

Monday, July 6, 2015

Bestie twin nails with @polished_ink!

**nothing to disclose**

Hey y'all! Today on the blog I have some bestie twin nails to share with you! I have one scheduled bestie twin nails collaboration each month, though lately I have been twinning with lots of great nail artists! I just love the chance to collaborate with others to further my skill and make friends. This month I got to pair up with @polished_ink and she had the idea to recreate these Kiss press ons that her daughter saw at the store and fell in love with. 


Here's my solo shot from the twin nails that we did. I used Shinespark Yuppie Yellow, Pumped Pink, Outrageous Orange, and Bouncin' Blue along with Rainbow Honey Neon Yoshimi for this mani. I stamped over the gradient using UberChic 3-03 to emulate the image on one of the press ons. I really loved how bright these turned out! 


And that concludes June's bestie twin nails! What do you think of this mani?

Thanks for reading!
Love, 
Pish 

**Want to see more? Follow me on Instagram for more nail art and swatches!**

Wednesday, June 24, 2015

Simple dotted flower nail art!

**This polish was a gift**


Hey y'all! Today on the blog I have a super simple post to share with you to share some nail art that I did. Read after the break for a simple explanation of how I did these nails!


I started with a base of Pahlish Stars at Rest as my base, which was a gift from my super sweet friend, Dancer. She knows how I feel about blue and crellies and she said that this just spoke to her when she saw it so she had to get it for me! She was right, I love it! Though I do wish I had set it upside down a while before using it as you can see that the glitter has settled pretty badly. You live and learn, right? So anyway, I did two coats of Stars at Rest and gave it a few minutes to dry. Then I used a dotting tool and some acrylic paints to dot on the flowers. I topped everything with Seche Vite. 

To be honest, I did not like this mani. Though the flowers matched the color of the glitter in the crelly, I felt that something was just off. I did wear it for a couple of days to see if it would grow on me but it didn't. Still, I did feel like the flowers turned out well! What do you think of this mani? What is your favorite simple, go to nail art technique? 

Thanks for reading! 
Love, 
Pish 

**Want to see more? Follow me on Instagram for more nail art and swatches!**

Friday, April 17, 2015

Stamping over a holo base!

**Nothing to disclose**

Hey y'all! 

Today on the blog, I have this super sparkly stamped mani to share with you. Pictures just did this one no justice at all. It was probably one of my favorite manis ever! 


M Polish Sweetclover stamped over KBShimmer Pigment of My Imagination 

Here's a shot of what I used:

Left to right: QTica Natural Nail Growth Stimulator, KBShimmer Pigment of My Imagination, Shinespark Polish Moondust, M Polish Sweetclover, KBShimmer Clearly On Top


I started with a base of KBShimmer Pigment of My Imagination - 2 coats and added a coat of Shinespark Moondust on top. Once that was dry, I stamped with M Polish Sweetclover and topcoated with KBShimmer Clearly On Top. I love how it turned out so much! How about a macro to show the holo, glittery goodness?


What do you think of this look? What is your favorite holo topcoat? 


Want to see more? Find me on INSTAGRAMYOUTUBE, and TWITTER for more nail art, swatches, and tutorials!

Monday, March 30, 2015

Stamping with M Polish over a pastel jelly sandwich base!

**Nothing to disclose**

Hey y'all! 

Today on the blog, I have some springy/Easter-y stamping for you. I love how delicate this turned out, although my light box washed it out a bit. 

Stamping with M Polish Apricot Delight

I was thrilled with how this turned out. I was inspired by the super talented Ana over at Ana's Manis for this mani. If you're not following her, you should be! She does beautiful work. 

How about a shot of what I used to create this mani? 


Left to right: QTica Natural Nail Growth Stimulator, China Glaze Inner Beauty, Cagedbird Nail Lacquer Faerie Carnival, M Polish Apricot Delight, Zoya Satin topcoat.

And because I had a total DUH moment, I forgot to include the stamping plate in the above photo, so I took a separate shot after the fact: 

BornPretty Store stamping plate #JQ-18

I started with my QTica base coat. That stuff is the bee's knees for real. My nails have never been healthier! I went on to adding one coat of China Glaze Inner Beauty. This polish was a clearance purchase from Sally's Beauty Supply and I was pleasantly surprised to find out it was a jelly. If you've been reading my last 10 or so posts, you know that I am having a major love affair with all of the jelly and crelly polishes!

After my first coat of Inner Beauty was mostly dry, I added a coat of Cagedbird Lacquer Faerie Carnival. I purchased this polish in a destash and fell in love with it. I was so disappointed to find out that this indie brand is no longer in business. :( This polish is a glitter topper that has scattered holographic micro glitter and matte pastel hex glitter in a clear base. SO beautiful for spring manis. Once that layer was dry, I went back with one more layer of Inner Beauty and allowed a few minutes of dry time before moving on to stamping.

Using M Polish Apricot Delight and my BPS stamping plate, I added a lacy floral design to my jelly sandwich. I decided that I didn't want it to be super shiny so I topped it with the Zoya Satin topcoat that I got from Ulta as a free gift when they were running a promotion.

Here's a macro to show the details of the stamping. How delicate is that?


Macro of stamping with M Polish Apricot Delight over China Glaze Inner Beauty and Cagedbird Nail Lacquer Faerie Carnival 

I have been doing Easter manis this week and kind of wanted to do something that wasn't super Easter-y but could still fall into that category. What do you think of the final result?

Want to see more? You can find me on INSTAGRAM for more nail art and polish swatches!

Saturday, March 28, 2015

Watermarble and stamping!

***Nothing to disclose***


Hey y'all!

Today on the blog, I have some super fun watermarble nails to show you! I was positively thrilled with the outcome of this mani. I wore it for 3 full days because I loved it so much. 

Watermarble nails using Shinespark Polish's 80's Neon Collection


Here's what I used to create this look:


Back row, left to right: QTica nail growth stimulator, Orly White Tips, Funky Fingers Dark Knight, INM Northern Lights, KBShimmer Clearly On Top. Front row, left to right: Shinespark Polish Pumped Pink, Yuppie Yellow, Psych'd Purple, Bouncin' Blue, and Glam Green. Stamping Plate in the front is Cici&Sisi Plate 03.

Here's a closer look at the image I used to stamp:

Image from Cici&Sisi plate 03.
I started with a base of Orly White Tips after applying my base coat. I allowed it to mostly dry and applied a liquid latex barrier around my finger for the watermarble. I started dropping the polish into the water in the order that I showed them above, made a random design, and dipped my fingers one at a time. I actually wasn't planning on stamping these at first but this watermarble was NOT my best work and I didn't have time to redo an entire mani. I had seen my lovely friend Megatuce stamp over a neon watermarble so I just went with it. I used Funky Fingers Dark Knight to stamp my design and sealed it all in with KBShimmer Clearly On Top. I love it! 

Here's another shot of the finished product:

Neon watermarble with stamping

What do you think of this look? Have you ever stamped over a watermarble design?


Want to see more? Follow me on INSTAGRAM for more nail art and polish swatches!


Thursday, March 26, 2015

Watermarble using M Polish!

***Nothing to disclose***


Hey y'all!


Today on the blog, I have a simple post for you showing these pink and nude watermarble nails. 


Watermarble using KBShimmer In Bare Form as a base and M Polish Annette for the marble.

Here's a picture showing what I used for this look:

Left to right: QTica nail growth stimulator, KBShimmer In Bare Form, M Polish Annette, Sally Hansen Clear'd For Takeoff, KBShimmer Clearly On Top

I started with 3 coats of KBShimmer In Bare Form as a base color for my watermarble. Once it had a few minutes to mostly dry, I placed liquid latex around my nail to protect my skin from the polish. Using M Polish Annette and a clear polish from Sally Hansen called Clear'd For Takeoff, I created the watermarble that you see above. Once it had dried for a few minutes, I added my favorite new topcoat: KBShimmer Clearly On Top. 

I was really happy with how this turned out, although it was cloudy that day so I wasn't able to capture the sparkle of In Bare Form which is always a bummer. Why is it always cloudy when I want to wear a holo?! 

What do you think of this look? Have you ever used clear polish for a watermarble? Which clear is your favorite for that technique?


Want to see more? Find me on INSTAGRAM to see more nail art and swatches!

Saturday, March 14, 2015

MPolish "Mama Loves Polish" Mother's Day duo swatch and review!

**Press Sample**


Hey y'all!

Today on the blog, I have a swatch and review of the MPolish "Mama Loves Polish" Mother's Day duo that releases on Thursday, March 19th.

MPolish Annette and Sliver of Hope

First, let me start by saying that I absolutely adore how a handwritten card is included in all of the packages from MPolish. She even included a wax seal to close the envelope, y'all! Talk about attention to detail. It has a unicorn on the front and she hand printed inside!

MPolish Annette and Sliver of Hope


This duo was created by MPolish for a friend of ours in the nail community, Rebekah, that recently lost her best friend, Annette to breast cancer. Annette left behind a husband and three young children, ages 1, 3, and 7 years. Annette received care for her cancer but by the time they caught it, she was at stage 4. After a 3 month long battle, Annette lost her fight. That is when Rebekah decided to join the Avon Walk to End Breast Cancer, a division of the Avon Foundation. She is running a fundraiser with the intention of walking the full 39.3 miles of this walk for her friend, Annette and all women and their families that suffer from breast cancer. You can visit Rebekah's page for the fundraiser HERE


Moving on to the swatches and review, I started with Sliver of Hope which is a gorgeous gunmetal shade of silver. It is very thick, as stamping polish should be and very opaque. I am no well-seasoned stamper by definition but the formula on these polishes is phenomenal and so simple to work with. For those of us that struggle with stamping these polishes make it so easy because in my experience with them, they pick up the first time, every time. I used a stamping plate JQ-18 from ALIEXPRESS for the design and a WINSTONIA stamper from Amazon to stamp my nails. Perhaps my favorite quality of these polishes, other than their ease of use is their ability to be used over light and dark colors. As you can see here, I used it over Zoya Tove which is in the same color family and it shows up perfectly.

MPolish Sliver of Hope stamped over Zoya Tove
The second polish of the duo, and my favorite is Annette. Annette can best be described as a delicate, metallic pink that looks lovely over lighter or darker colors. This polish has the same qualities as Sliver of Hope and is very easy to use. Whether you are a novice stamper or stamping is old hat to you, you will find these polishes a dream to work with. I did a gradient of Zoya Purity and Tove to show Annette's chameleon-like abilities over lighter and darker colors. I used the same image three times and was profoundly amazed by the completeness of the image that picked up with this polish. As I stated before, I am not a seasoned stamper and have always found it rather difficult. Its great to see that if you actually use the proper tools what you're able to accomplish. 

MPolish Annette over a gradient of Zoya Purity and Tove

This duo is a definitely a winner and a must have. I love that it is not only beautiful and has a winning formula but that it has a meaningful tribute behind its creation. The "Mama Loves Polish" duo will release on Thursday, March 19th and will only be sold as a set. The set will retail for $13.50 with 50% of the proceeds going directly to the fundraiser in honor of Annette. You can purchase this duo, along with other MPolish HERE. She has just expanded her shipping to the UK and Australia! 

As always, thank you for reading!

Have you any polishes with special meaning to you? What are they?

**All opinions expressed in the review portion of this post are my own. These polishes were sent to me by the maker in exchange for my honest, forthright opinion.**