Wednesday, April 29, 2015

My nail care routine!

Hey y'all! 

Today on the blog, I thought I would share my nail care routine with you. I never understood how important it was to show love to your hands until my nails started peeling, constantly breaking, and just looking generally awful. I always kind of just thought that manis were a luxury, not a necessity. Well I am reformed and here to tell you that a good nail care routine is essential to healthy, beautiful nails. Let me start by showing you my basics: 

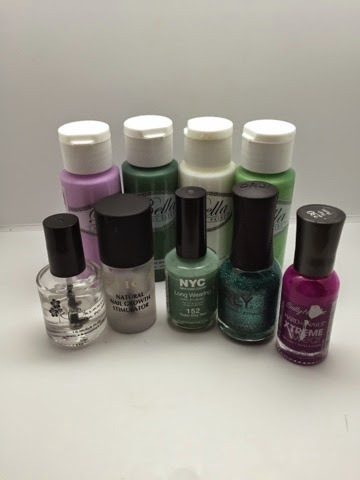
My nail care basics/holy grail products
To start with, I only use non-acetone polish remover on my nails unless I have some VERY stubborn glitter or something that absolutely will not come off otherwise. I prefer the one from Sally's Beauty Supply because as it dries, it smells like cherries! Who doesn't love that? My latest obsessions have to be mani bombs (pictured is one from Cuter Cuticles - purchased by me). They just leave your hands feeling so luxuriously soft and relaxed afterwards and they smell divine. I love dropping one in and feeling all the fizzies! I also always use Sally Hansen cuticle remover, the blue kind which is extra strength, a glass file, cuticle nippers for those stray bits of skin, a metal cuticle pusher, and a good cuticle oil/salve. So let's go step by step through my routine! 

Here's what I started with, a mani that was a few days old, had some tip wear, had some white paint on it from where I was painting my fireplace, and some pretty dry cuticles: 


I started with removing my polish with my Beauty Secrets non-acetone remover and some cotton balls. Then it was time for the mani bomb! This one was called Chill Pill and it definitely eased some stress I'd had that day. And its blue, my favorite! 

Getting my mani bomb on! 
Once my water had gotten cold, it was time to move on to those raggedy cuticles. Let me preface this by saying NEVER cut your cuticles. It will cause them to grow back thicker and they'll be more likely to crack. Always used a cuticle pusher or orange stick and gently push them back. Always push them back after your hands are wet, the skin will be softer and less prone to cracking. About once a week, I use the Sally Hansen Extra Strength cuticle remover to help get any skin that has grown onto my nail off, it also helps soften and remove pesky little hangnails or bits of skin. 

I did one hand at a time so that I didn't leave the remover on my nails too long, and gently pushed each cuticle back with the cuticle pusher using the curve of the pusher to work off any dead skin on or around my cuticles. Once that was done, I washed my hands and dried well. 

Time to file! I have gone to only using a glass file on my nails. Since changing over to a glass file exclusively, I find that I have much less peeling! The filing process takes a little longer but the grit on my file is so fine that it really gives me the opportunity to control my shape. I gently filed each of my nails which I have to do often to maintain my almond nail shape. #pointynailproblems 


Once I was finished filing and had wiped all the bits of filed nail off with my hand towel, it was time to moisturize. Now, I will say that I haven't found my absolute holy grail moisturizer yet but I do quite like this cuticle salve that I've been using for about a month. It soaks in quickly and has a very aromatic lavender scent. Moisturizing is possibly the most important part of nail and cuticle health. Dry nails are brittle, prone to breaking, and more likely to peel. So show those nails some moisture! 

Stained but healthy! 

Some other things to keep in mind for long, healthy nails: your nails are not tools! Don't use them to open things or pry things; Always use a base coat to protect your natural nails; your nails are weaker without polish so always wear at least a base coat - even if its just a protein base; and most importantly of all - love on those nails! Manis are a necessity, not a luxury. :)

Post mani nails! 

What are some of your favorite nail care tips and tricks? How often do you give yourself a full mani? Thanks for reading!

Love, 
Pish 


Find me on Instagram for more nail art and swatches!


Blue China inspired bestie twin nails!


Hey y'all! 

Today on the blog I have this blue china print inspired mani to share with you! This mani was a part of a bestie twin nails collab I did with a super talented lady on instagram known as The Polished Perspective, make sure you go check her out and see her version! 


We decided to use this print as inspiration for our manis: 

Image credit: Google images

Let me show you what I used to create this look:


Qtica Natural Nail Growth Stimulator, Zoya Purity, acrylic craft paint, KBShimmer Clearly On Top, a dotting tool, and two different detail brushes

I started with a base color of Zoya Purity as my blank canvas over one coat of my Qtica base coat. Once my base was dry, I started in with my detail brushes and dotting tools and just sort of doodled until I had a design that I liked. I used two different blues and a white (for touch up) for the details. Once it was dry, I sealed it all in with a coat of KBShimmer Clearly On Top. 


This isn't my first foray into blue china print nails. I did this design 42 weeks ago using Sally Hansen Pacific Blue and a stamping plate by Cici&Sisi. I definitely feel that my skill level has improved since then! 

My first attempt at blue china print nails, 42 weeks ago!

Here's our collage showing both manis, make sure to go show my nail bestie some love! 


What do you think of this mani? Have you ever done a mani inspired by a print? 

Find me on INSTAGRAM for more nail art and swatches!


Sunday, April 26, 2015

Jamberry inspired!

Hey y'all!

Today on the blog I have this Jamberry inspired nail art to share with you. A group of nail friends and I partake in a weekly challenge and this mani was a product of a "recreate a Jamberry wrap" weekly challenge. I was really pleased with how they came out. I'm also playing around with hand poses so I am showing a new one in this post. 


Let me start with showing you what I used to create this mani:

Left to right (front): KBShimmer Clearly On Top, Qtica Natural Nail Growth Stimulator, NYC Tudor City Teal, Orly Steal The Spotlight, and Sally Hansen Xreme Wear Pep-Plum. (Back): Acrylic craft paints for the details


So I started out with the Qtica for my base coat as usual to protect my natural nail and then added a couple of coats of NYC Tudor City Teal to my index, middle, and ring fingers as a base color for the nail art. I added Orly Steal the Spotlight to my pinkie and thumb for some sparkly goodness. Once my base color was dry, I used white acrylic paint to make the dots, Sally Hansen Pep-Plum for the base of my roses, and light purple acrylic paint for the details of the roses. I went back with two different green acrylic paints for the leaves of the roses. Once it was all dry, I topped with KBShimmer Clearly On Top to seal everything in! 

Here's another shot of my mani with the wrap on the left to show my inspiration:


What do you think of this mani? Have you ever used Jamberry or recreated one of their wraps? 

Find me on INSTAGRAM for more nail art and swatches!


Saturday, April 25, 2015

Negative space stamping

Hey y'all! 

Today on the blog, I have kind of a special post! I'm debuting my new nail shape on my blog! 

I had a really bad break on my Cindy hand that led some nail friends of mine to suggest I try almond shaped nails. At first, I was super nervous to try it because it was such a change for me! I went ahead, balls to the wall and here we are with this mani to show you! 


This mani was super easy, let me show you what I used:


Left to right: Qtica Natural Nail Growth Stimulator, Fresh Paint Burning Flame, Zoya Owsin, Funky Fingers Dark Knight, a sheer black jelly that I made, and KBShimmer Clearly On Top. 


Let me show you a closer look at the stamped image. This is from UberChic Beauty 1-03:


Rather than write out how I did it, I would love to show you a tutorial I did on YouTube. One of my first, please let me know what you think!


What did you think of this mani? Have you ever considered drastically changing your nail shape? 

Friday, April 17, 2015

Stamping over a holo base!

**Nothing to disclose**

Hey y'all! 

Today on the blog, I have this super sparkly stamped mani to share with you. Pictures just did this one no justice at all. It was probably one of my favorite manis ever! 


M Polish Sweetclover stamped over KBShimmer Pigment of My Imagination 

Here's a shot of what I used:

Left to right: QTica Natural Nail Growth Stimulator, KBShimmer Pigment of My Imagination, Shinespark Polish Moondust, M Polish Sweetclover, KBShimmer Clearly On Top


I started with a base of KBShimmer Pigment of My Imagination - 2 coats and added a coat of Shinespark Moondust on top. Once that was dry, I stamped with M Polish Sweetclover and topcoated with KBShimmer Clearly On Top. I love how it turned out so much! How about a macro to show the holo, glittery goodness?


What do you think of this look? What is your favorite holo topcoat? 


Want to see more? Find me on INSTAGRAMYOUTUBE, and TWITTER for more nail art, swatches, and tutorials!

Wednesday, April 15, 2015

Shinespark Polish: The Light, The Heat review part 2!

**press sample**


Hey y'all! Today on the blog I have part 2 of the swatch and review series for the Shinespark Polish: The Light, The Heat summer collection. Today I will be showing you "The Heat" portion of this collection, also known as the thermals. Shall we get started then? 


Let's start with Tiger Eye, a butterscotch to copper shifting thermal. This color may not be for everyone but I adored it on me. The formula was perfection, its shown here in two easy, buttery coats with topcoat. The shift is very subtle, but I really like that about it! It dries to a metallic like finish and has microshimmer that really pops with a topcoat. I have nothing bad to say about this one! I think this one would be even better for fall than summer, but I think its a very beautiful, unique shade nonetheless:


Shinespark Polish Tiger Eye: 2 coats with topcoat


Next up is Hummingbird, a bright metallic green to deep grass green shifting thermal. I love the color of this one! I had no issues with application, except that I did get a few brush strokes with this one as you can see on my index finger. I think I overworked the polish on that nail a little though. I really love the brightness of this one and the subtle shift of the green across the nail. This one is perfect for spring and summer: shown here in 2 easy coats with topcoat, it dries to a metallic finish. 

Shinespark Polish Hummingbird: 2 coats plus topcoat

The next one I have to show you is Peacock, a bright teal to dark blue shifting thermal. This one is stunning and easy to apply as well. Shown in 2 coats plus topcoat, you can see the subtle shift and metallic finish. It also has some shimmer in it as well. This one was definitely one of my favorites. 

Shinespark Polish Peacock: 2 coats plus topcoat

The next one I have to show you is Purple Martin, a pinky/purple to dusty bluish purple shifting thermal. This one was so beautiful but so hard to photograph. In real life, it almost looked like a thermal duochrome, my nail was like 4 different colors at a time! I did my best to capture that here. The thermal shift in this one is hard to see because it is very subtle and this one took 3 coats but they built up nicely and were easy to apply. This one is also metallic in finish. 

Shinespark Polish Purple Martin: 3 coats plus topcoat

Last but most certainly not least in "The Heat" portion of this collection is Dusk. I'll pause for a second and let you take it in.... Okay. This one shifts from a blush pink to a deep midnight purple. It is so aptly named as it looks just like the sky at dusk. This one had a good formula and is shown in 2 coats plus topcoat here. It has the most obvious shift of all 5 polishes in this collection. It has more of a jelly kind of finish rather than metallic, though it is completely opaque. It also has a subtle shimmer throughout. 

Shinespark Polish Dusk: 2 coats plus topcoat

This collection releases along with "The Light" on April 29th. You can purchase it on the Shinespark Polish website HERE. Keep up to date with future news and releases on her INSTAGRAM.

Want to see more? Follow me on all my social media sites to see more nail art, swatches, and tutorials! INSTAGRAMYOUTUBE, and TWITTER


***This polish was provided at a discount in exchange for quality photos and an honest review. All opinions expressed in this review are my own***

Monday, April 13, 2015

Shinespark Polish: The Light, The Heat part 1!

***press sample***


Hey y'all! Today on the blog I have part 1 of a two part swatch and review series for the Shinespark Polish "The Light, The Heat" summer collection to share with you. This first part will feature "The Light" portion of the collection, also known as the photochromic polishes. I have a bunch of photos to show you, so let's get started! 


First up in this series of swatches is Flamingo, a baby pink color in the shade with a jelly/crelly finish. This one had a good formula but it did take 3 coats to reach opacity. The coats were easy to apply and not thick or goopy. This one dries semi matte so I would recommend adding a shiny topcoat! Once you step into the direct sunlight, this polish deepens to a darker pink with a little hint of blue shimmer. This one is perfect for spring! 

Shinespark Polish Flamingo: 3 coats plus topcoat 


The next one I have to show you is Periwinkle, a lavender cream that shifts to a brighter purple in the sun with hints of silver shimmer throughout. This one is shown in 2 coats plus topcoat and had an easy formula. This one also dries semi matte, so a shiny topcoat will really bring out the beauty of Periwinkle. 


Shinespark Polish Periwinkle: 2 coats with topcoat 

The next one I have to show you is Ocean, a teal cream that shifts to a bright ocean-y blue in the sun with a hint of silver shimmer throughout. This one is shown in 2 easy coats with topcoat. It could have almost been a one coater but did need a second to even it out. A topcoat is needed for this one as well as it dries semi matte like the others. I loved this one so much! 

Shinespark Polish Ocean: 2 coats plus topcoat 

Up next is Tangerine, a orange-y nude in the shade that deepens slightly to a true dark orange color in the sun. This one didn't have any shimmer in it and only took 2 coats to reach opacity. It was a little thick on application but not difficult to apply, it self leveled nicely. This is not a color I would normally gravitate towards because it clashes with my skin tone but how I wish it looked better on me because I was surprised to find that I loved it! As the others in this collection, it dries semi matte so you'll want to topcoat it. 

Shinespark Tangerine: 2 coats plus topcoat 

The final swatch in this series is Green Apple, a mint green in the shade that shifts to a bright honeydew green in the sun. This one was one of my favorite colors for sure! It was easy to apply - shown here in 2 coats plus topcoat. This one also dries semi matte, so you will want to topcoat it to bring out its true beauty! 

Shinespark Polish Green Apple: 2 coats plus topcoat

"The Light, The Heat" summer collection will be available for purchase on April 29th on the Shinespark Polish website, HERE. Follow her on INSTAGRAM for more news and future releases! 

Which one is your favorite from this collection? Do you own any photochromic polishes? 


Want to see more nail art, swatches, and tutorials? Follow me on INSTAGRAMYOUTUBE, and TWITTER


***This polish was provided at a discount in exchange for quality photos and honest review. All opinions expressed in this review are my own***

Tuesday, April 7, 2015

Guest blogging from acidicice!


Hey y'all! I have something very special for you on the blog today. The very talented acidicice wrote a post for me to host on my blog and I wrote one for hers! That's right, we have a guest post feature today! I think I will be doing these more frequently because she was so easy to work with and her work is beautiful. Check her out over on her blog, and maybe take a look at my post over HERE! I hope you enjoy!

~~~~~~~~~~~~~~~~~~~~~~~~~~~~~~~~~~~~~~~~~~~~~~~~~~~~~~~~~~~~~~~~~~~~~~~~


Hi everyone! I'm acidicice and I hail from Cape Town, South Africa. I've been painting my nails and dabbling in nail art for the last 2 years. I was super excited to be able to invade Karen's blog for a day and really hope I can live up to it! When Karen and I were discussing what we would do for our guest posts (that's right! There's a post up by Karen on my blog today :) ) I mentioned that I have never tried leadlighting and we decided that we would do that! If you haven't heard of this technique before, basically you use very sheer jelly polishes to "colour in" a stamped image. It doesn't have to be perfect, which is exactly the kind of technique I like since I mess up a lot :P This is the very first time I've tried this technique, let me show you what I came up with.

image


image


 I started off with my usual Tip Top base coat to protect my natural nails. I painted 2 coats of Sinful Colors Snow Me White as a base. Once that was dry I used essence black stampy polish with my large squishy stamper and plate BP-17 from bornprettystore stamp on all of my nails. Here is a picture of the plate I used:


I then set to work on filling the image in with small dotting tools. The polishes you use to fill in the image need to be very sheer so that the stamping shows up through the colour. That's why black is usually the stamping colour used when you leadlight. I ended up thinning my jelly polishes with clear to make them less opaque and I made my own jellies with clear and creme polishes. These are the colours I used: China Glaze You Drive Me Coconuts (pink), Are You Jelly? (purple), Flip Flop Fantasy (orange), Sinful Colors Rise and Shine (teal) and Rubybox For the Chill of It (blue). Once I had finished filling in the image on all of my nails I sealed it in with a coat of Seche Vite. Ta da! I would really love to hear what you think of my very first leadlighting mani :) Thanks so much to Karen for having me here on her blog. What an honour! If you would like to find more of my nail art you can check out my blog, Instagram, Facebook page or Twitter :) You can also catch me on Bloglovin'.

image