Saturday, January 31, 2015

Negative space Valentine's Day mani!

Hey y'all! 


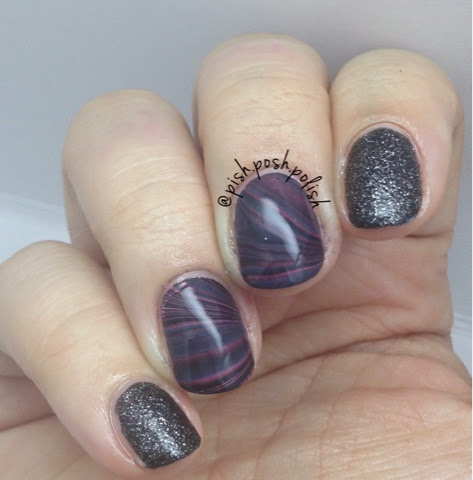
Tonight on the blog I have a new Valentine's Day mani featuring a negative space heart. I was inspired by One Nail To Rule Them All for this nail art. 

Here's a shot of what I used:


Pretty simple tools today - a base of OPI Nail Envy, Zoya Kitridge and Binx, white acrylic paint, a dotting tool, and a small detail brush. 

After I laid down my base coat, I paintd my index, pinkie, and thumb with Zoya Kitridge and Binx on my ring finger. I did 2 coats of each. I dotted Binx on my Kitridge nails with the large side of the dotting tool and followed that with the smaller side for some accents. I topped those and my Binx finger with Seche Vite.

Now on to the star of the show - the heart! I used my small detail brush that I picked up from Michael's craft store and made an empty heart with Kitridge. Once it was mostly dry, I went around the outside of the heart with my detail brush to fill in the rest of the nail with Kitridge. Once everything had dried, I used my detail brush again with some white acrylic paint to emphasize the outline of the heart. After that was dry, I topped with Seche Vite and voila! A darling Valentine's Day mani! 


What do you think of this look? Although definitely not new, the negative space mani is set to be very trendy this year. Do you like manis like this? 


Thursday, January 29, 2015

Nail Art January: match your outfit of the day!

Hey y'all! 


Today on the blog I have a watermarble for #nailartjan day 28: match your outfit of the day. I'm happy with how these turned out even though the pink isn't as vibrant as I wanted it to be. Here's what I used: 


Today I started with a new base - Essie protein base. I've been suffering from some peeling so I decided to give this a try. I will update and let y'all know how it goes! I painted my index, pinkie, and thumb with Zoya Dahlia and then top coated those with Seche Vite. I painted my middle and ring finger with Orly White Tips. While that was drying I placed liquid latex from Amazon around my two middle fingers to protect them when I watermarbled. Here's the container I have: 


I just use a q-tip to apply it. Once the latex dried, I used OPI Kiss Me I'm Brazilian and Zoya Willa for the marble. Here's what it looked like before the design: 


And then I drew in the water with a toothpick:


I pulled my finger out of the water slowly, peeled off the latex, and top coated with Seche Vite. Here's a macro of the marbled nail: 


And a final look at the finished mani: 


What do you think of this vampy watermarble? 


Saturday, January 24, 2015

Gradient stamping!

Hey y'all! I've been a little absent this week because my youngest had a birthday this week! He turned one. Where does the time go? 


So onto the nails, that's why we're here, right? I was inspired by sprinklesnails on Instagram for this technique. Here's what I used: 


I started with Zoya Anchor and then laid down a silver base of Zoya Seraphina. This polish was in my untried pile for so long after I got it on clearance at ULTA and wow, is it ever beautiful! 

Next, I used Maybelline bleached neons (which stamp so well!) in Coral Heat, Day Glow Teal, and Lime Accent for the stamp gradient. I used this image from a cheapie plate with no name:


I thought it was such a dainty floral image! I put Coral Heat at the top of the image, Day Glow Teal in the middle, and Lime Accent at the bottom and scraped like usual, picked it up with my stamper, and slowly rolled it onto my nail. Once it dried, I topped with Seche Vite. 

I really loved how this turned out. Here's another picture of the final result:


What do you think of this look? Have you tried multicolored stamping? 


Wednesday, January 14, 2015

Neon Watermarble!

Hey guys!

Who says neons are just for the summer? Well, they're also for January says....ME! 

I've been seeing tons of neon watermarbles floating around on Instagram that use the Pipedream A Night In Vegas creme polishes buuuuuuut I don't have them! So I busted out my neons from Five Below. The brand is Funky Fingers and they marble surprising well! I added in Japanese Koi by China Glaze and Pacific Blue by Sally Hansen which obviously not a neon but I don't have a blue neon. I need to fix that, I suppose! Here's a shot of what I used:


So here's what I did: 

I started with Zoya Anchor as always. I painted my index, pinkie, and thumb with Zoya Willa (the best black creme of life) and my middle and ring with Orly White Tips. Once that had a few minutes to dry, I put three small dots on the black nails, allowed it to dry, and top coated with Seche Vite. 

On to the marbling! I've recently discovered using liquid latex around my fingers to minimize cleanup so I put that around the middle two fingers. I used my small Tupperware filled with tap water as usual. I did a walk through of my marbling steps in a previous blog post. You can read it HERE.

 If you'd like to see a video tutorial, I filmed a short one on my INSTAGRAM if you'd like to see it in action. 

Macro of the marbling in 3...2...1...

I hope you enjoyed this post. I had a lot of fun busting out the neons in the dead of winter. Do you go by seasonal "rules" for nail polish? 


Saturday, January 10, 2015

The 90's called...

Hey y'all! The 90's called...and they want their nails back! 

Okay, so I was listening to 90's hits all day yesterday. When I sat down to do my nails I thought, "What would The Fresh Prince do?" And voila! 

Here's what I used: 


I started with Zoya Anchor as always and then painted all of my nails with Orly White Tips. I grabbed a latex free makeup sponge from Target and cut it down to the size of my nail bed. I used Maybelline Bleached Neons in Lime Accent, Pink Punch, and Dayglow Teal along with Fresh Paint Passion Fruit in random dots all over the sponge to create the background for the stamp. It looked something like this before I sponged it onto my nail:


I went over each nail with that twice. In between passes I added more polish to the sponge. Once I had completed one whole hand, I topped all the nails with Seche Vite and moved onto the other hand. 

Now that my nails looked like a throwback to Lisa Frank, I decided to stamp over them with this image: 

I used Zoya Willa to stamp the image. Once my image was stamped onto all of my nails, I topped with Seche Vite again to seal everything. Here's another look at the final result! 

I absolutely adore how these turned out! What do you think of this look? What decade would you put on your nails? 


Saturday, January 3, 2015

Nail art January: fresh

Hey ya'll! 

I'm taking a little break from birthday manis so I can start my monthly nail art challenge. Today's prompt was fresh which immediately make me think black and white. Here's what I used:


I started with Zoya Anchor as usual. Once that was dry I used Zoya Willa on my thumb, index, and pinkie, Zoya Dahlia on my ring finger, and Orly White Tips on my middle finger. Once my base colors dried, I stamped my middle finger with Zoya Willa and Born Pretty Store plate number QA91.


I went back to Orly White Tips and my green dotting tool to do a large dot followed by a small dot on my thumb, index, and pinkie. Once everything was dry, I topped the whole mani with Seche Vite to seal everything. 


I really love how this mani came out. It feels so chic. What do you think of this look? What color palette says, "chic" to you? 


Thursday, January 1, 2015

Birthday water marble mani!

Hey ya'll! 

Today on the blog I have the second mani of my birthday series for this week. I love how this turned out! I'll be including my step by step instructions in this post. There are tons of water marble tutorials out there, but maybe mine will help someone out. Here's what I used: 

I started as usual with my Zoya Anchor base coat. After that dried, I put one coat of Orly White Tips on my index and middle finger and 3 coats of Zoya Ginni on my ring, pinkie, and thumb. I taped around my index and middle to prepare for the water marble. 


Here's my container that I use for water marble. I fill it with plain old tap water. 

I used NYC Lexington Lilac, Sinful Colors Tempest, and Maybelline Pink Punch for the water marble. 

And here's what my design looked like:


The best thing to remember when water marbling is that your whole design doesn't have to be perfect. Since you're dipping one finger at a time, you only need one area that looks right. See the top middle-ish area? That was perfect for the design I wanted even though the rest looks so messy. I dipped and repeated for all 4 fingers I was doing. This is what it looked like:

I cut the tape off and waited for a few minutes and then I topped with Seche Vite. 

Moving on to the ring finger, I hand painted some balloons to keep with the birthday theme. I used this brush I got from Michael's craft store:

Since I was doing it over glitter, I used white acrylic paint to make the balloons first and then painted over the white with the same colors I used for the marble. Then I used black acrylic paint for the outline and the string of the balloon. After that dried, I topped with Seche Vite. 

I cleaned up around my cuticles using an ELF concealer brush and that is pretty much it, guys. I know a lot of people say to use room temperature water that is filtered but honestly, I've had plenty of luck just turning on the tap and going to town without waiting for it to reach room temperature. If it doesn't work for you to use tap water, then definitely use filtered, room temp water and see if that helps. Here's another look at the final result: 


What do you think of this mani? What kind of designs would you like to see picture tutorials on? Was this tutorial helpful to you? 

Thank you for reading!