

Today on the blog I have the second mani of my birthday series for this week. I love how this turned out! I'll be including my step by step instructions in this post. There are tons of water marble tutorials out there, but maybe mine will help someone out. Here's what I used:

I started as usual with my Zoya Anchor base coat. After that dried, I put one coat of Orly White Tips on my index and middle finger and 3 coats of Zoya Ginni on my ring, pinkie, and thumb. I taped around my index and middle to prepare for the water marble.

Here's my container that I use for water marble. I fill it with plain old tap water.

I used NYC Lexington Lilac, Sinful Colors Tempest, and Maybelline Pink Punch for the water marble.

And here's what my design looked like:

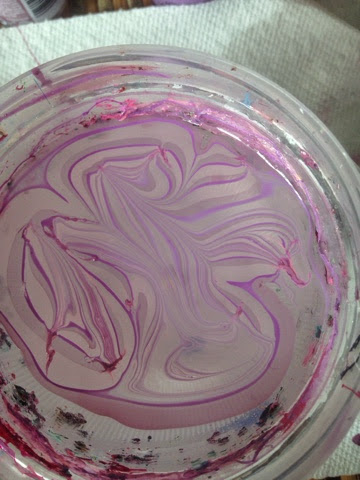
The best thing to remember when water marbling is that your whole design doesn't have to be perfect. Since you're dipping one finger at a time, you only need one area that looks right. See the top middle-ish area? That was perfect for the design I wanted even though the rest looks so messy. I dipped and repeated for all 4 fingers I was doing. This is what it looked like:

I cut the tape off and waited for a few minutes and then I topped with Seche Vite.
Moving on to the ring finger, I hand painted some balloons to keep with the birthday theme. I used this brush I got from Michael's craft store:

Since I was doing it over glitter, I used white acrylic paint to make the balloons first and then painted over the white with the same colors I used for the marble. Then I used black acrylic paint for the outline and the string of the balloon. After that dried, I topped with Seche Vite.

I cleaned up around my cuticles using an ELF concealer brush and that is pretty much it, guys. I know a lot of people say to use room temperature water that is filtered but honestly, I've had plenty of luck just turning on the tap and going to town without waiting for it to reach room temperature. If it doesn't work for you to use tap water, then definitely use filtered, room temp water and see if that helps. Here's another look at the final result:

What do you think of this mani? What kind of designs would you like to see picture tutorials on? Was this tutorial helpful to you?
Thank you for reading!
Love this mani! It is very cute! And the photos/tutorial were very helpful :D
ReplyDeleteThank you! I'm glad it was informative!
DeleteI love how the marble came out and those balloons are too cute.
ReplyDeleteThanks so much!
DeleteI love this mani! It came out great! I'd love to see super simple nail art tutorials for the artistically challenged like me lol.
ReplyDeleteThank you! I will make my next design a simple one! 😃
DeleteGorgeous watermarble! I think I may attempt one tonight, wish me luck haha
ReplyDeleteI can't wait to see it!
DeleteOkay...you've inspired me to give it yet another try! I'll dedicate it to your birthday! :) Although if it goes badly, we just won't ever speak of it again... ;)
ReplyDeleteWoo hoo! I can't wait to see it! ❤️❤️❤️
DeleteI love everything about this mani from the colors to the watermarble to the balloons! Your step by step pictures are very helpful too!
ReplyDeletewow, love that marble design. Balloons are so cute :)
ReplyDeleteLovely shade and water marble looks great too..
ReplyDeleteI do love a good watermarble! This was lovely!
ReplyDelete