Showing posts with label freehand nail art. Show all posts

Sunday, October 18, 2015

Mani Swap with Acidicice!


Hey y'all! Today on the blog I have some mani swap nails to share with you. I have practically been begging Acidicice to do a mani swap with me since we met a few months ago and she finally caved! I totally fell in love with her Little Mermaid inspired nails that she did a few months back and just couldn't wait to recreate it. And I adore her take on my neon animal print mani. See that Orly Mirrorball she's holding? I sent it to her! Isn't that fun that polish can make it from one side of the world to the other?! 

Here's my solo from our mani swap:


I used Color Club Blue Heaven for my base and painted most of the details with acrylic paint and filled in Ariel's tail with Sinful Colors Nail Junkie. I did film a tutorial for this but it didn't turn out very good! I need more practice with freehand nail art and probably won't be filming any tutorials for them anytime soon! 

Do you guys like doing mani swaps? I've said it before but I love mani swaps because they always push me outside my comfort zone! Make sure you head over to her blog and check out her post about our mani swap and show her some love. 

Thanks for reading!

Want to see more? Click below to follow my social media! 


Wednesday, September 16, 2015

Then and Now - Waterfall Mani!


Hey y'all! Today on the blog I'm showing you a "then and now" mani where I recreated one of my older manis to see if I could improve it. The original mani was one I did in a swap with +anas manis way back 60 weeks ago! Let me show you the older version. 


I daresay I've improved! I did the same technique in both manis, using a striping brush to create the waterfall effect. This time I used vampy fall colors - Zoya Veronica, Teigan, and Tomoko. I painted Teigan on my index and pinkie, and Veronica on my middle nails. Using the same striping brush that I used way back when, I made waterfall lines with Teigan and Tomoko and top coated with Essie Gel Setter to finish it off. I love how it turned out! 


Have you ever done a then and now mani? Its so fun to show yourself how you've improved over time. I have people ask me often how I paint my nails so well and I always have one answer: PRACTICE! So get out those paint brushes and paint, paint, paint! 

Thanks for reading! 
Want to see more? Click below to find me on social media! 


Monday, August 10, 2015

Mani Swap with @color_obsessed30!


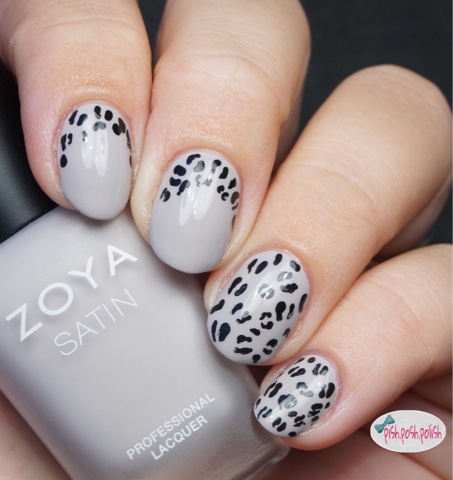
Hey y'all! Today on the blog I have a mani swap to share with you! This was a part of my monthly collab with some nail friends of mine where we are randomly paired up via random.org and swap manis. I always look forward to doing these because it really pushes me to try new combos. This month was no exception. I was paired up with @color_obsessed30 who had done a beautiful nude animal print skittle mani that I fell in love with. Keep reading to find out how I completed my mani - and make sure you go check her out on Instagram and show her some love!


I started off with a base coat of Zoya Leah - one of the beautiful neutrals from the Satin line that they released earlier this year. Its this nude that sometimes looks sort of pink and sometimes looks sort of grey. If grey and pink had a baby....

Anyway, I put two coats of Zoya Leah down and let it dry - then I went back in with my smallest dotting tool and some black acrylic paint to make the...leopard? print. Its been brought to my attention that a lot of us in the western part of the world have confused both ourselves and Google on which is cheetah and which is leopard. I believe cheetah has a spot in the middle with irregular black around it and leopard is like a negative space version. Haha. 

I replicated what @color_obsessed30 did by completely covering my pinkie and ring with the spots and then doing a ruffian version on my index and middle. Once the acrylic paint was dry, I top coated with Seche Vite and that's it! Such a simple nail art tutorial that makes a big, chic statement. I wore this for two full days because I loved it so much. 


What do you guys think of this mani? What are some of your favorite nudes to wear? 

Thanks for reading! 
**Want to see more? Make sure to follow me on Instagram, Twitter, and Facebook for more swatches and nail art!**


Friday, August 7, 2015

Neon Gradient Tribal Nails!


Hey y'all! Today on the blog I have some nail art to share with you. I did this sort of neon, tribal nail art using some polishes from Indigo Bananas and was really happy with how it came out. More importantly I was THRILLED with how my photos came out with my camera. I'm getting better!

Image credit: Google Images

Okay, on to the nails! I started with a base of Orly White Tips for my gradient nails - actually funny little tidbit is that my middle finger had a gradient on it as well and I got all the way to top coating it and starting on my other hand and messed it up. Rather than re-doing it, I just threw some Zoya Dahlia on it. Fixed! 

Anyway, so once my white base was dry, I applied liquid latex around my nails to protect them from all the excess polish from the gradient. I put my polish on a latex free sponge starting with Phlogiston Paradise, then Zinc Industries, and finally Neon, the 10th Element and rolling it on my nails. I did about 3 passes with the sponge, each time reloading the polish so my sponge didn't dry out. Once I had achieved the opacity I was looking for, I peeled off my latex and started hand painting tribal doodles on my nails with black acrylic paint and striping brush. I waited for the black to dry, and topped everything with Seche Vite. 

Here's some mani pic spam!


What do you think of this mani? What's your favorite nail art to do over a gradient? 

Thanks for reading! 
**Want to see more? Follow me on Instagram, Facebook, and Twitter for more nail art and swatches!**


Wednesday, April 29, 2015

Blue China inspired bestie twin nails!


Hey y'all! 

Today on the blog I have this blue china print inspired mani to share with you! This mani was a part of a bestie twin nails collab I did with a super talented lady on instagram known as The Polished Perspective, make sure you go check her out and see her version! 


We decided to use this print as inspiration for our manis: 

Image credit: Google images

Let me show you what I used to create this look:


Qtica Natural Nail Growth Stimulator, Zoya Purity, acrylic craft paint, KBShimmer Clearly On Top, a dotting tool, and two different detail brushes

I started with a base color of Zoya Purity as my blank canvas over one coat of my Qtica base coat. Once my base was dry, I started in with my detail brushes and dotting tools and just sort of doodled until I had a design that I liked. I used two different blues and a white (for touch up) for the details. Once it was dry, I sealed it all in with a coat of KBShimmer Clearly On Top. 


This isn't my first foray into blue china print nails. I did this design 42 weeks ago using Sally Hansen Pacific Blue and a stamping plate by Cici&Sisi. I definitely feel that my skill level has improved since then! 

My first attempt at blue china print nails, 42 weeks ago!

Here's our collage showing both manis, make sure to go show my nail bestie some love! 


What do you think of this mani? Have you ever done a mani inspired by a print? 

Find me on INSTAGRAM for more nail art and swatches!


Sunday, April 26, 2015

Jamberry inspired!

Hey y'all!

Today on the blog I have this Jamberry inspired nail art to share with you. A group of nail friends and I partake in a weekly challenge and this mani was a product of a "recreate a Jamberry wrap" weekly challenge. I was really pleased with how they came out. I'm also playing around with hand poses so I am showing a new one in this post. 


Let me start with showing you what I used to create this mani:

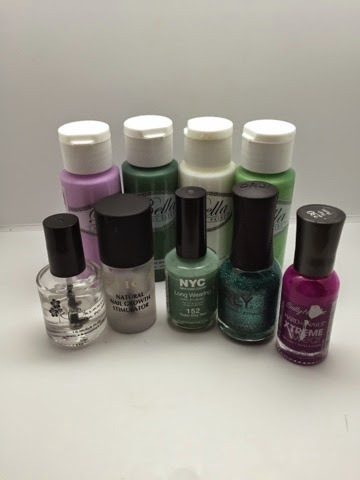
Left to right (front): KBShimmer Clearly On Top, Qtica Natural Nail Growth Stimulator, NYC Tudor City Teal, Orly Steal The Spotlight, and Sally Hansen Xreme Wear Pep-Plum. (Back): Acrylic craft paints for the details


So I started out with the Qtica for my base coat as usual to protect my natural nail and then added a couple of coats of NYC Tudor City Teal to my index, middle, and ring fingers as a base color for the nail art. I added Orly Steal the Spotlight to my pinkie and thumb for some sparkly goodness. Once my base color was dry, I used white acrylic paint to make the dots, Sally Hansen Pep-Plum for the base of my roses, and light purple acrylic paint for the details of the roses. I went back with two different green acrylic paints for the leaves of the roses. Once it was all dry, I topped with KBShimmer Clearly On Top to seal everything in! 

Here's another shot of my mani with the wrap on the left to show my inspiration:


What do you think of this mani? Have you ever used Jamberry or recreated one of their wraps? 

Find me on INSTAGRAM for more nail art and swatches!


Monday, March 30, 2015

Tropical gradient nails!


Hey y'all! 

Today on the blog I have a short and sweet post for you to show off these tropical gradient nails I did. 


Let me start off by showing you what I used to create this look: 


I started with my Qtica Natural Nail Growth Stimulator as my base coat to protect my natural nail. I've found that it also helps my nails with peeling, so double win! I put Zoya Tomoko on my thumb, index, and pinkie for some sparkle. I did two coats and added a quick dry topcoat, I used KBShimmer Clearly On Top. I used Orly White Tips for the base of my gradient. 

Once my one layer of that was dry, I used Shinespark Polish Pumped Pink, Outrageous Orange, and Psych'd Purple on a makeup sponge to create my sunset gradient. I did 2 passes with the sponge to get the opacity I wanted and allowed it to dry. 

Once my gradient had a few minutes to dry, I went in with my black acrylic paint and a small detail brush and hand painted the palm trees. I was surprised with how easy it actually was! Once my trees were dry, I top coated with Clearly On Top to seal everything in. 

I really loved this mani, it was simple but made such a statement. What do you think of it? What are you favorite, easy freehand designs?