Showing posts with label zoya nail polish. Show all posts

Friday, January 29, 2016

Weekly Series: #bhbuntriedchallenge

Heeeeey y'all! Today on the blog I am starting a new series! How exciting! A nail friend, +The Polished Perspective came up with a huge list for our little nail group so that we could delve into our untried and unloved polishes. This is something we had chatted a little about before so when she posted our list, I was all too excited to get started! The first prompt was to use a polish that started with the letter A. Let me show you what I came up with!


I started with Zoya Arabella as my untried/unloved polish. Arabella is one of the first polishes I bought after becoming an aggressive polisher. I found her at Ulta in the clearance bin and since I was buying everything under the sun at the time, of course I snatched it up. I don't show my mainstream polishes enough love so that's the drawer I went to first and Arabella was an easy choice because look how pretty she is! I have used Arabella in only one other mani that I can recall so it was sorta like meeting an old friend when I painted on that first coat. I did two coats of Arabella on all of my nails except my ring finger. For that nail, I did a swirl marble accent nail (inspired by Sveta Sanders) using Zoya Margo and M Polish Cranberry. I found that using my No. 7 watermarble tool from Whatsupnails worked the best for this technique. Once everything was dry, I topcoated with a shiny, quick dry topcoat. Heres the final result:


Long story, long - I must deeply apologize to Zoya Arabella for ignoring her for so long. The perfection that is the Zoya Pixie Dusts cannot and should not be ignored for so long ever again! 

What do you think of this mani? What's your favorite polish that starts with the letter A?

Thanks for reading!

Follow me!


Wednesday, January 20, 2016

Press Release: Zoya Whispers Promo With Free Gift!


GET THE LOOK…
ZOYA WHISPERS LOW SATURATION NEUTRAL!


Buy Any 3 Whispers Colors, 
Get the Low Saturation Manicure Kit FREE*! 
Now – 1/24/16 (11:59pm EST)
USE CODE: WHSP!

Kit includes 0.25OZ Naked Base, 0.25OZ Pink Perfector, 0.25OZ Naked Gloss, 0.25OZ Fast Dry Drops, 1oz Remove Plus 0.25oz.
Not available for individual sale. $30 Retail Value.
*Details on Zoya.com.


Sunday, January 10, 2016

Press Release: Zoya Promo FREE4YOU!


Get ANY 4 Zoya Nail Polish Shades FREE*
Just pay promotional shipping
Start your year off on a colorful note with NEW, toxin-free shades. We’re making it extra easy for you to get a head start on your resolutions by switching to a healthier, BIG5FREE formula… you can pick ANY 4 colors to receive FREE – just pay promotional shipping.

The hardest choice you’ll make all year is which 4 colors to choose!
Click HERE to get started!


Friday, November 27, 2015

Nail Art: Textured Peppermint Winter Nails!


Hey y'all! Today on the blog I have some wintery/Christmassy nail art to share with you! I was really in the mood to use some textured polishes but I wasn't sure which colors or art to do with them. I am actually a huge fan of textured polishes and the PixieDust line is what got me started on Zoya polishes. My first textured polish was Zoya Tomoko and I haven't looked back since! I also really love the OPI Liquid Sands so I pulled out OPI Solitaire and Zoya Oswin for this peppermint/candy cane look. I have some more pictures to share with you and a short step by step on how I completed this mani! 


I started by applying my favorite base coat to protect my natural nails - I use LynBDesigns B-Stronger. Once that was dry, I painted two coats of OPI Solitaire on my thumb, ring finger, and pinkie. I went back with Zoya Oswin after my base color had dried and added the two tiny dots with my smallest dotting tool. I did topcoat with LynBDesigns B-Shiny but only one coat to preserve the texture of the polishes. I mostly added the topcoat to prolong wear. Starting on my middle finger, I used a thin striping brush to add OPI Solitare closest to my cuticle and at an angle. I cleaned off my striping brush and did the same thing with Zoya Oswin. I repeated back and forth, cleaning my brush between each color until I reached the tip of my nail. Once the lines were dry, I went back with the same striping brush and cleaned up my lines a little and intensified each of the colors. I allowed my design to dry and topcoated, again only using one layer of topcoat to preserve the texture of the polishes. And that's it! Super easy and very few tools required for this look. 

Macro of my middle finger 
Macro showing the designs on my middle finger and ring finger

That's it for this nail art look, what do you think? What's your favorite winter/Christmassy design to do?

Thanks for reading!

Want to see more? Click below to connect with me!


Wednesday, September 16, 2015

Then and Now - Waterfall Mani!


Hey y'all! Today on the blog I'm showing you a "then and now" mani where I recreated one of my older manis to see if I could improve it. The original mani was one I did in a swap with +anas manis way back 60 weeks ago! Let me show you the older version. 


I daresay I've improved! I did the same technique in both manis, using a striping brush to create the waterfall effect. This time I used vampy fall colors - Zoya Veronica, Teigan, and Tomoko. I painted Teigan on my index and pinkie, and Veronica on my middle nails. Using the same striping brush that I used way back when, I made waterfall lines with Teigan and Tomoko and top coated with Essie Gel Setter to finish it off. I love how it turned out! 


Have you ever done a then and now mani? Its so fun to show yourself how you've improved over time. I have people ask me often how I paint my nails so well and I always have one answer: PRACTICE! So get out those paint brushes and paint, paint, paint! 

Thanks for reading! 
Want to see more? Click below to find me on social media! 


Thursday, August 13, 2015

Stamping over one stroke flowers! **ALMOST NAIL FAIL ALERT**


Hey y'all!
Today on the blog I have this delicate flower mani to share with you. I was really happy with how this turned out even though the original plan was a complete fail- it was totally planned around the flakie polish - LaqueredUp No Ragrets. Keep reading to find out how I did this mani! 


I started with a base of Zoya Ana on my index and middle fingers and LaqueredUp No Ragrets on my ring and pinkie fingers. Once my base was dry - I did what I suppose is TECHNICALLY one stroke flowers but - let's just put it this way - if they'd turned out looking good at ALL, this mani wouldn't have wound up stamped. Yep, the stamping covers up a fail. :P 

I am calling it a happy fail though - because this image from UberChic Beauty 1-02 looks so pretty over the purple and white one stroke flowers! Once the stamp was dry, I went in with a little of No Regrets to bling out the center of the flower and top coated with Seche Vite. 

What do you think of this mani? What's one of your "nail fail quick fixes"? 

Thanks for reading! 
**Want to see more? Follow me on Instagram, Facebook, and Twitter for more nail art and swatches!**


Monday, August 10, 2015

Mani Swap with @color_obsessed30!


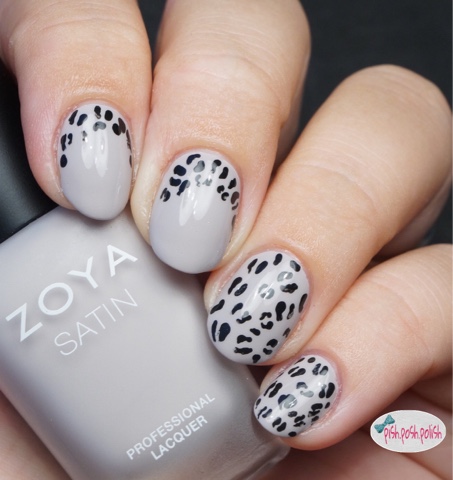
Hey y'all! Today on the blog I have a mani swap to share with you! This was a part of my monthly collab with some nail friends of mine where we are randomly paired up via random.org and swap manis. I always look forward to doing these because it really pushes me to try new combos. This month was no exception. I was paired up with @color_obsessed30 who had done a beautiful nude animal print skittle mani that I fell in love with. Keep reading to find out how I completed my mani - and make sure you go check her out on Instagram and show her some love!


I started off with a base coat of Zoya Leah - one of the beautiful neutrals from the Satin line that they released earlier this year. Its this nude that sometimes looks sort of pink and sometimes looks sort of grey. If grey and pink had a baby....

Anyway, I put two coats of Zoya Leah down and let it dry - then I went back in with my smallest dotting tool and some black acrylic paint to make the...leopard? print. Its been brought to my attention that a lot of us in the western part of the world have confused both ourselves and Google on which is cheetah and which is leopard. I believe cheetah has a spot in the middle with irregular black around it and leopard is like a negative space version. Haha. 

I replicated what @color_obsessed30 did by completely covering my pinkie and ring with the spots and then doing a ruffian version on my index and middle. Once the acrylic paint was dry, I top coated with Seche Vite and that's it! Such a simple nail art tutorial that makes a big, chic statement. I wore this for two full days because I loved it so much. 


What do you guys think of this mani? What are some of your favorite nudes to wear? 

Thanks for reading! 
**Want to see more? Make sure to follow me on Instagram, Twitter, and Facebook for more swatches and nail art!**