Showing posts with label Nail stamping. Show all posts

Monday, November 2, 2015

Review: Stamping Plate From bornprettystore!


Hey y'all! Today on the blog I have a review of a stamping plate from bornprettystore to share with you. I'm basically obsessed with the mani that I did with this plate so let's just jump right in to the photos and review!
Item #: BP-71 from bornprettystore.com with blue film still on it. 
With film removed.

I'm always pleased with the performance of my BPS plates and BP-71 was no exception to that. Its got a romantic love theme which is perfect for silhouette manis. I love that all of the images play off of each other as BPS has a knack for making plates that have random images on them from time to time. Each image that I picked up on this plate picked up fully and crisply with no issues. The plate felt evenly etched and very good quality.

I decided to go with a hazy, romantic day walk in the woods for the mani that I did with this plate. Let me show you how it turned out:


The images stamped in red are from BP-71, all of the other images came from another plate that I reviewed from BPS, you can read that review HERE. I started on my bare nail with no base color and then used a sheer black jelly that I frankened to start giving that hazy, rainy look. I stamped a line of trees using M Polish Cayuga, added another layer of jelly, stamped the same trees with M Polish Pekin, layered more jelly, and then topcoated with KBShimmer Clearly On Top. Once everything was dry, I stamped the couple with the umbrella image and the "LOVE" image from BP-71 using M Polish I Need A Vacation and topcoated with KBShimmer Clearly On Top once more to seal it all in.

If you'd like to pick up this plate or any other items from bornprettystore, you can use my code PPPQ10 for 10% off your regularly priced items.


What do you think of this plate? How would you use it?

Thanks for reading!

Want to see more? Click below to connect with me!


Wednesday, October 7, 2015

Nail Art: Green Fall Florals!


Hey y'all!Today on the blog I am sharing some more fall nail art with you. This time using deep, rich greens with a hint of sparkle.

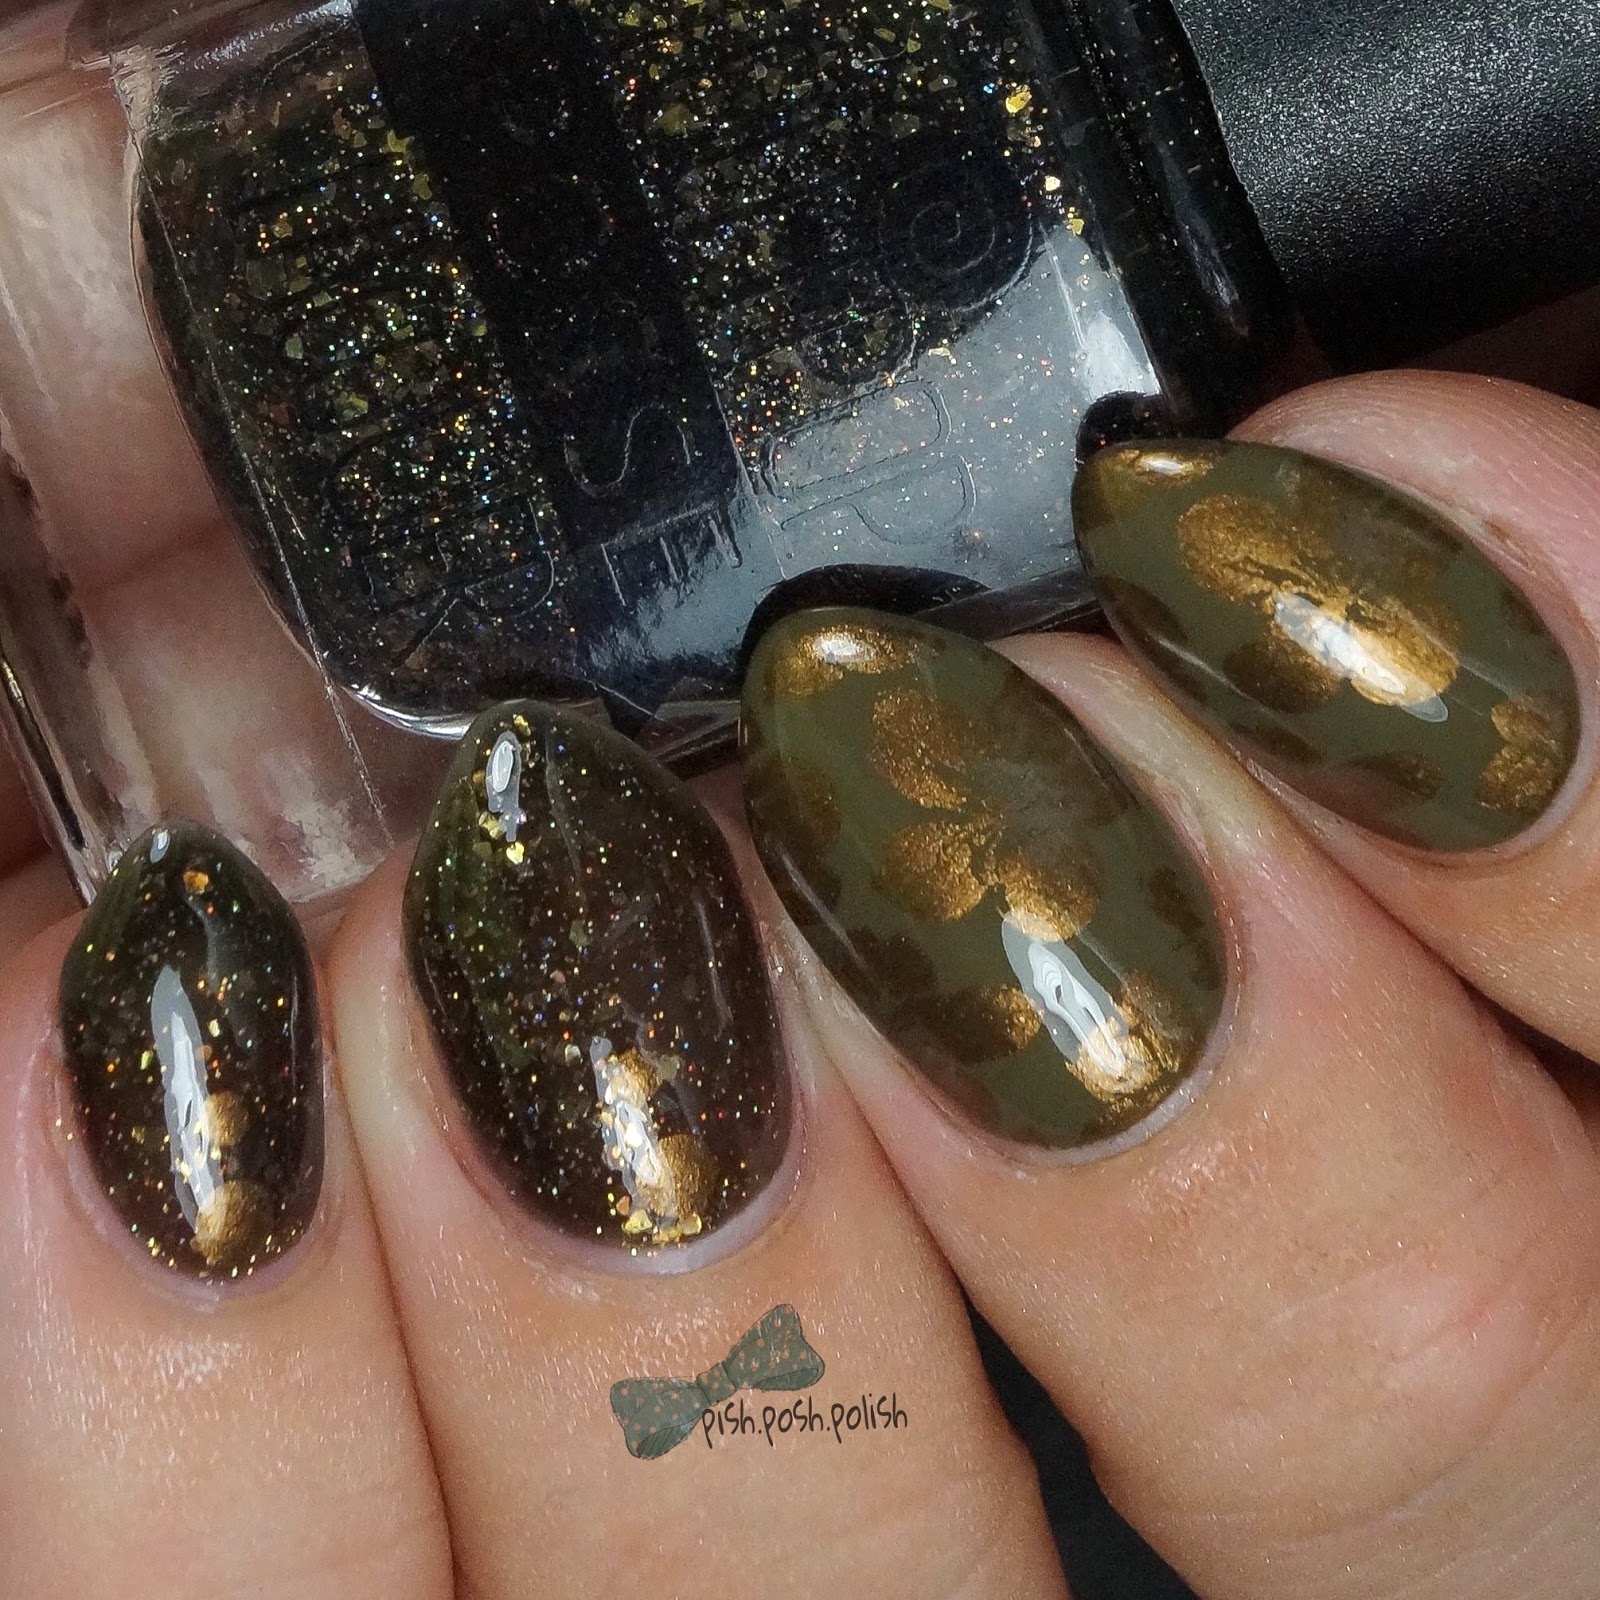
I started with a base of Nail Envy to strengthen and protect my natural nails. Once that was dry, I went in with Sally Hansen Loden Green, from the Complete Salon Manicure line on my index and middle. Now, this color is a love it or hate it kind of color but I'm in the love it camp so I based this entire mani around it. Anyway, then I used Lollipop Posse Lacquer Inside My Head on my ring and pinkie fingers to give it some bling and sparkle. I am head over heels for Inside My Head - its a blackened green jelly base with scattered holo micro glitter and dark gold flakies all throughout it. STUNNING! Once my base colors were dry, I stamped Loden Green with M Polish Elizabethan and Uber Chic Beauty 4-03. I had considered doing leaves but that is very popular right now so I switched it up and went floral. I added a couple of dots on my ring and pinkie, also with Elizabethan. I sealed everything in with Essie Gel Setter and I wore this mani for 3 full days!

I was going to do a full review of Essie Gel Setter but I never wear my manis long enough to say whether its wear time is actually longer or not. Perhaps I can do it on my cindy hand? Would you want to read a review on it?

If you want to see a live version of this tutorial, click below to go to my Youtube channel!


What do you think of this mani? Do you like the "ugly" pretty colors?

Thanks for reading!


Want to see more? Click below to connect with me! 

Wednesday, September 9, 2015

Night Sky Silhouette Nails - Bestie Triplet Nails with @pretty_in_pink_polish and @okie.glam.mani!


Hey y'all! Today on the blog I have some nail art to share with you - a night sky silhoutte mani that I did in a collaboration with @pretty_in_pink_polish and @okie.glam.mani on Instagram. Make sure you go check theirs out and show them some love! 


I started off with a white base - and sponged a gradient of Salon Perfect Baby Blues, Zoya Ling, and Zoya Sailor and then topped with INM Northern Lights topcoat to give me the night sky effect. Once that was dry, I used a stamping plate from bornprettystore (BP-L011) for the trees and the deer - those are stamped with M Polish Cayuga. I allowed my stamping to dry and then topcoated with Seche Vite to seal everything in - and that's it! I also tried it with a matte topcoat but ultimately liked it better shiny because I felt like the gradient had more dimension that way. I did a tutorial on Youtube for this mani, click below to go check it out!


What do you think of this mani? What's your favorite art to do over a gradient?  

Thanks for reading! 
**Want to see more? Follow me on all of my social media outlets to see more nail art and swatches!**

Sunday, September 6, 2015

Stamping Plate Comparison: Pet'la Golden Russian vs. BCN-006 (image heavy)

Comparison of Pet'la Golden Russian and BCN-006
Hey y'all! Today on the blog I have a comparison to share with you of the Pet'la Golden Russian plate and a plate entitled BCN-006. Spoiler alert - one of them is amazing and the other one is a terrible knock off copy cat of the original. Ready to jump in?


BCN-006 on the left, Pet'la Golden Russian on the right
So here are so preliminary facts that you need: Pet'la Plate is owned and operated by Petra and her husband. They are an indie plate maker located in Hungary and each plate is carefully crafted to strict specifications. Whoever the maker is of BCN has directly copied the images off the Golden Russian plate from Pet'la Plate without giving credit to Petra and her originality of design. The difference in cost is significant because the quality of Pet'la Plates is akin to a custom made piece of furniture vs BCN who's quality is more akin to a prefab piece of furniture you would get at a discount outlet on clearance. 

The differences come from materials used - Petra's Pet'la Plates are carved on a brass metal that is twice the thickness of the silver metal used by BCN. The etching on the Pet'la Plate is very deep which gives you a clear, crisp image on your stamper and nail, while the BCN plate barely feels engraved upon touching it and gives spotty, uneven images on your stamper and nail. Let me show you some images to show the differences. 


Petula Golden Russian

BCN-006
My experience with the Pet'la Plate was amazing - every image picked up beautifully and crisply on the stamper which led to a pleasant nail stamping experience while the BCN-006 plate was patchy and didn't transfer even half of the image to my nail on most of the plate. What's more is that BCN copied these images without Petra's knowledge and stole her proprietary property. The imposter plate was being sold on bornprettystore.com, but they have since removed the listing for the plate upon finding out that those images were stolen from Pet'la Plate. BCN is currently stocked on aliexpress and alibaba - I would STRONGLY recommend to anyone shopping those sites to carefully research what you are buying. What you might be saving in dollars on the plate itself, you are losing in quality. These people producing copied plates should not be supported and its unfortunate that they don't care to steal from others as long as they make a few bucks. 

If you'd like to see a live comparison of these plates - please click below to head over to my Youtube Channel.


If you'd like to buy the Pet'la Golden Russian plate, you can find it HERE. I have several Pet'la Plates and really love all of them - their quality rivals that of many other stamping plates I own. 

Thanks for reading! 
**Want to see more? Follow all of my social media outlets to see more nail art and swatches!**

**This product was provided by the maker free of charge in exchange for my honest review. All opinions expressed in this post are my own. I was not compensated.**


Friday, August 21, 2015

M Polish To Have And To Holo!


Hey y'all! Today on the blog I have a new polish from M Polish to share with you. Feast your eyes on To Have and To Holo (how cute is that name?!) from M Polish - a silver linear holographic stamping polish. To Have and To Holo was available for preorder as of August 10th and I just received my order a couple of days ago - I used it the very first day I got it. I'm going to show you the mani I did with it...ready? Let's go! 


To Have and To Holo is a silver super holographic (linear) stamping polish that shows beautifully over lighter or darker colors. In my mani, I paired it with Powder Perfect Melusina which is a teal based jelly glitter bomb. It was my first time using both polishes - and they played so nicely together. Since Melusina has some circle glitter in it, I picked this swirly image from a Cici&Sisi plate to stamp over it with To Have And To Holo. My experience with other M Polish is that my images pick up flawlessly on the first go and this one was no exception. Look at the detail in this macro! 


To Have and To Holo is currently sold out but will be restocking at the end of August so keep your eyes open - this is definitely a must have for stamping lovers. (EDIT: To Have And To Holo is back in store! Go get yourself one!!!) I think its going to look so beautiful over many different colors which is exciting with fall coming up and then the holidays being after that. Can we say holo stamped Christmas manis?! 

Will you be picking this beauty up from M Polish? 

Thanks for reading, 

**Want to see more? Follow me on Instagram, Facebook, and Twitter to see more swatches and nail art!**


Sunday, August 16, 2015

Bestie Twin Nails with Acidicice! And story time!


Hey y'all! Today on the blog I have a bestie twin nail collaboration to share with you, along with a little bit of story time. There's kind of a long story that goes into this collab so let's jump right in!

Here's a little backstory for you - Acidicice and I met in a blogger group and were randomly paired together to do a guest post on one another's blogs. I think she was actually originally supposed to be paired with someone else who couldn't do it at the time so we were reassigned to one another. Funny how the universe brings certain people into your life, isn't it? Anyway, we did our guest posts but kept chatting on Facebook and realized that we had SO MUCH in common. We have become fast friends, dear friends, bosom buddies, mom friends, and more. I share so much with her and literally the only negative to our friendship is that we live in different hemispheres - yep. I live in the United States and my darling friend lives across the world in South Africa. :(

Over the last 6 months or so, we have chatted a lot about the differences in our countries - one of them being her lack of access to a lot of wonderful nail things. Indies, cheap nail cleanup brushes and liquid latex from Amazon, etc, etc, etc. I knew that she was REALLY missing out on so many things so I started putting together a small box of nail goodies for her. Well, that ballooned out of control and what started as a handful of items actually wound up being barely able to fit into a medium flat rate box from USPS. When time came that I wanted to ship it - I found out the sad truth, that I wouldn't be able to afford to send it due to the cost of shipping and the crappiness of the postal service and customs department in South Africa. How was I going to send this box of goodies to my BFF?! 

Enter a long time friend of Acidicice's that now lives in the States! Her mother was flying from South Africa to visit in the States so I was able to send "The Box" to the friend, who's sweet mother packed it into her luggage and brought it back safely to South Africa. It MADE IT! Safe and sound - nothing broken, everything in tact. Acidicice was able to go the very next day to pick it up and we did a video call so I could watch her open everything. She cried, I cried. It was such a special moment - knowing that a piece of my life went all the way across the world - the people that were involved in making sure that it made it restored my faith in all that is right with the world. 

So we decided to do a twin mani so she could use her goodies that I have similarities to or dupes of. Check it out! Here's mine: 


I used Delush Polish 50 Shades of Yay as my base on the index and middle fingers and Indigo Bananas Phlogiston Paradise on my ring and pinkie. I then went back and stamped using M Polish Dancing In The Streets and Fresh Perspective and a handful of different stamping plates. 
Check hers out:


She used a different Delush Polish from the same collection - A Peony For Your Thoughts and Zoya Belinda and also stamped with M Polish Dancing In The Streets and Fresh Perspective. I love how they are similar images but still different than mine! Make sure you go check hers out on her blog

So that's my story time about our twin manis - this was possibly the most special moment in my nail life since I've joined this community. It was very special to be able to share those polishes and that moment with her. I hope to actually be able to meet her and see her beautiful nails in person one day. 

Thanks for reading! 

**Want to see more? Follow me on Instagram, Facebook, and Twitter for more swatches and nail art!**


Thursday, August 13, 2015

Stamping over one stroke flowers! **ALMOST NAIL FAIL ALERT**


Hey y'all!
Today on the blog I have this delicate flower mani to share with you. I was really happy with how this turned out even though the original plan was a complete fail- it was totally planned around the flakie polish - LaqueredUp No Ragrets. Keep reading to find out how I did this mani! 


I started with a base of Zoya Ana on my index and middle fingers and LaqueredUp No Ragrets on my ring and pinkie fingers. Once my base was dry - I did what I suppose is TECHNICALLY one stroke flowers but - let's just put it this way - if they'd turned out looking good at ALL, this mani wouldn't have wound up stamped. Yep, the stamping covers up a fail. :P 

I am calling it a happy fail though - because this image from UberChic Beauty 1-02 looks so pretty over the purple and white one stroke flowers! Once the stamp was dry, I went in with a little of No Regrets to bling out the center of the flower and top coated with Seche Vite. 

What do you think of this mani? What's one of your "nail fail quick fixes"? 

Thanks for reading! 
**Want to see more? Follow me on Instagram, Facebook, and Twitter for more nail art and swatches!**


Wednesday, August 5, 2015

July Favorites!


Hey y'all! Today on the blog I am going to share all of my favorite nail things from the month of July! Ready? Me too! Lets get started. 


I'll start off with my four favorite manis from the month of July - in order my top favorite is definitely my Harry Potter inspired mani. I did a collab with some nail friends for Harry Potter's birthday. I have a separate post coming about the collab we did so make sure to check back! The other 3 are tied for second place. Haha, yeah, definitely can't chose my second third or fourth faves out of them. I feel like July was a good month for me, I pumped out a lot of manis and felt like my work was definitely getting cleaner and better overall! 

July Mani Faves 

My next favorite thing was favorite technique. July was the month of stamping for me! UberChic Beauty stamping plates and my Creative Shop Stamper have proven themselves incredibly addicting for this aggressive polisher. I couldn't stop this month - many of my manis were stamped and the majority of stamping I did came from images on the UberChic Beauty plates.


The next favorite sort of ties into the last and that's my favorite polish of the month. It relates because its a stamping polish! This month's go to polish that made it into multiple manis was M Polish Berry Best Friends. BBF is a group custom berry pink holo stamping polish that was available only to the members of the M Polish Lovers group on Facebook.  Not a member? No worries - you can find it HERE and request to join. My understanding is that there may be more customs in the future! 


Final favorite this month is my favorite cuticle oil. To be fair, this brand has been my favorite since I started using it BUT the scent is a new one to me in the last couple of months. The brand is Morning Star Nails and the scent is Calm. I really love the earthiness of this scent and love that the scent lingers just a bit on my skin even long after the oil has soaked in. If you haven't tried Morning Star Nails, I highly recommend it! 


That's it for July's favorites! One more month of super intense late summer here and then we can *hopefully* start looking forward to fall! What were your favorite nail items for the month of July? 

Thanks for reading! 
**Want to see more? Follow me on Instagram, Facebook, and Twitter for more nail art and swatches!**

Friday, July 17, 2015

Born Pretty Store Dragonfly/Butterfly Stamping Plate Review!


Hey y'all! Today on the blog I have another review for Born Pretty Store, this time for another stamping plate. This is my final item to review this go around! This plate is one of many small round stamping plates available from Born Pretty Store and I really enjoyed using this one! Keep reading after the break to see what I did with it!


BP-74 from bornprettystore.com

So, first thoughts, I loved the look of this plate! It has some really cute butterfly images which take up most of the plate, but then they also included some little dragonflies! My first instinct was to use the butterflies and maybe do some leadlighting but I decided to step out of my comfort zone and use the dragonflies. I decided I was going to do some negative space along with it to give it a little more uniqueness. So I started with a base of Rhubidium Rhod by Indigo Bananas in a half moon mani. Once it was dry, I used Hottie by M Polish to stamp the dragonflies. I cleaned up the negative space area with my clean up brush so that there wasn't any stray dragonflies there. Hehe.  I top coated everything with Seche Vite at first but it was so glossy, it was hard to see the stamping so I added a matte top coat and I loved it! 

Final thoughts on this plate - I really liked the variety of butterflies which would be good for a number of stamping techniques but I also liked that they included the dragonflies for a little something extra. The image picked up easily for me on the first or second try which is pretty standard for me. The images transferred to my nails completely as well.


If you'd like to get this plate you can find it HERE. Don't forget that you can use my code PPPQ10 for 10% off your order of originally priced items.


What do you think of this mani? Which images would you use from this plate?

Thanks for reading!


**This product was provided to me free of charge in exchange for my honest review. All opinions in this post are my own.** 

Want to see more? Follow me on Instagram for more nail art and swatches!