Showing posts with label MPolish. Show all posts

Wednesday, October 7, 2015

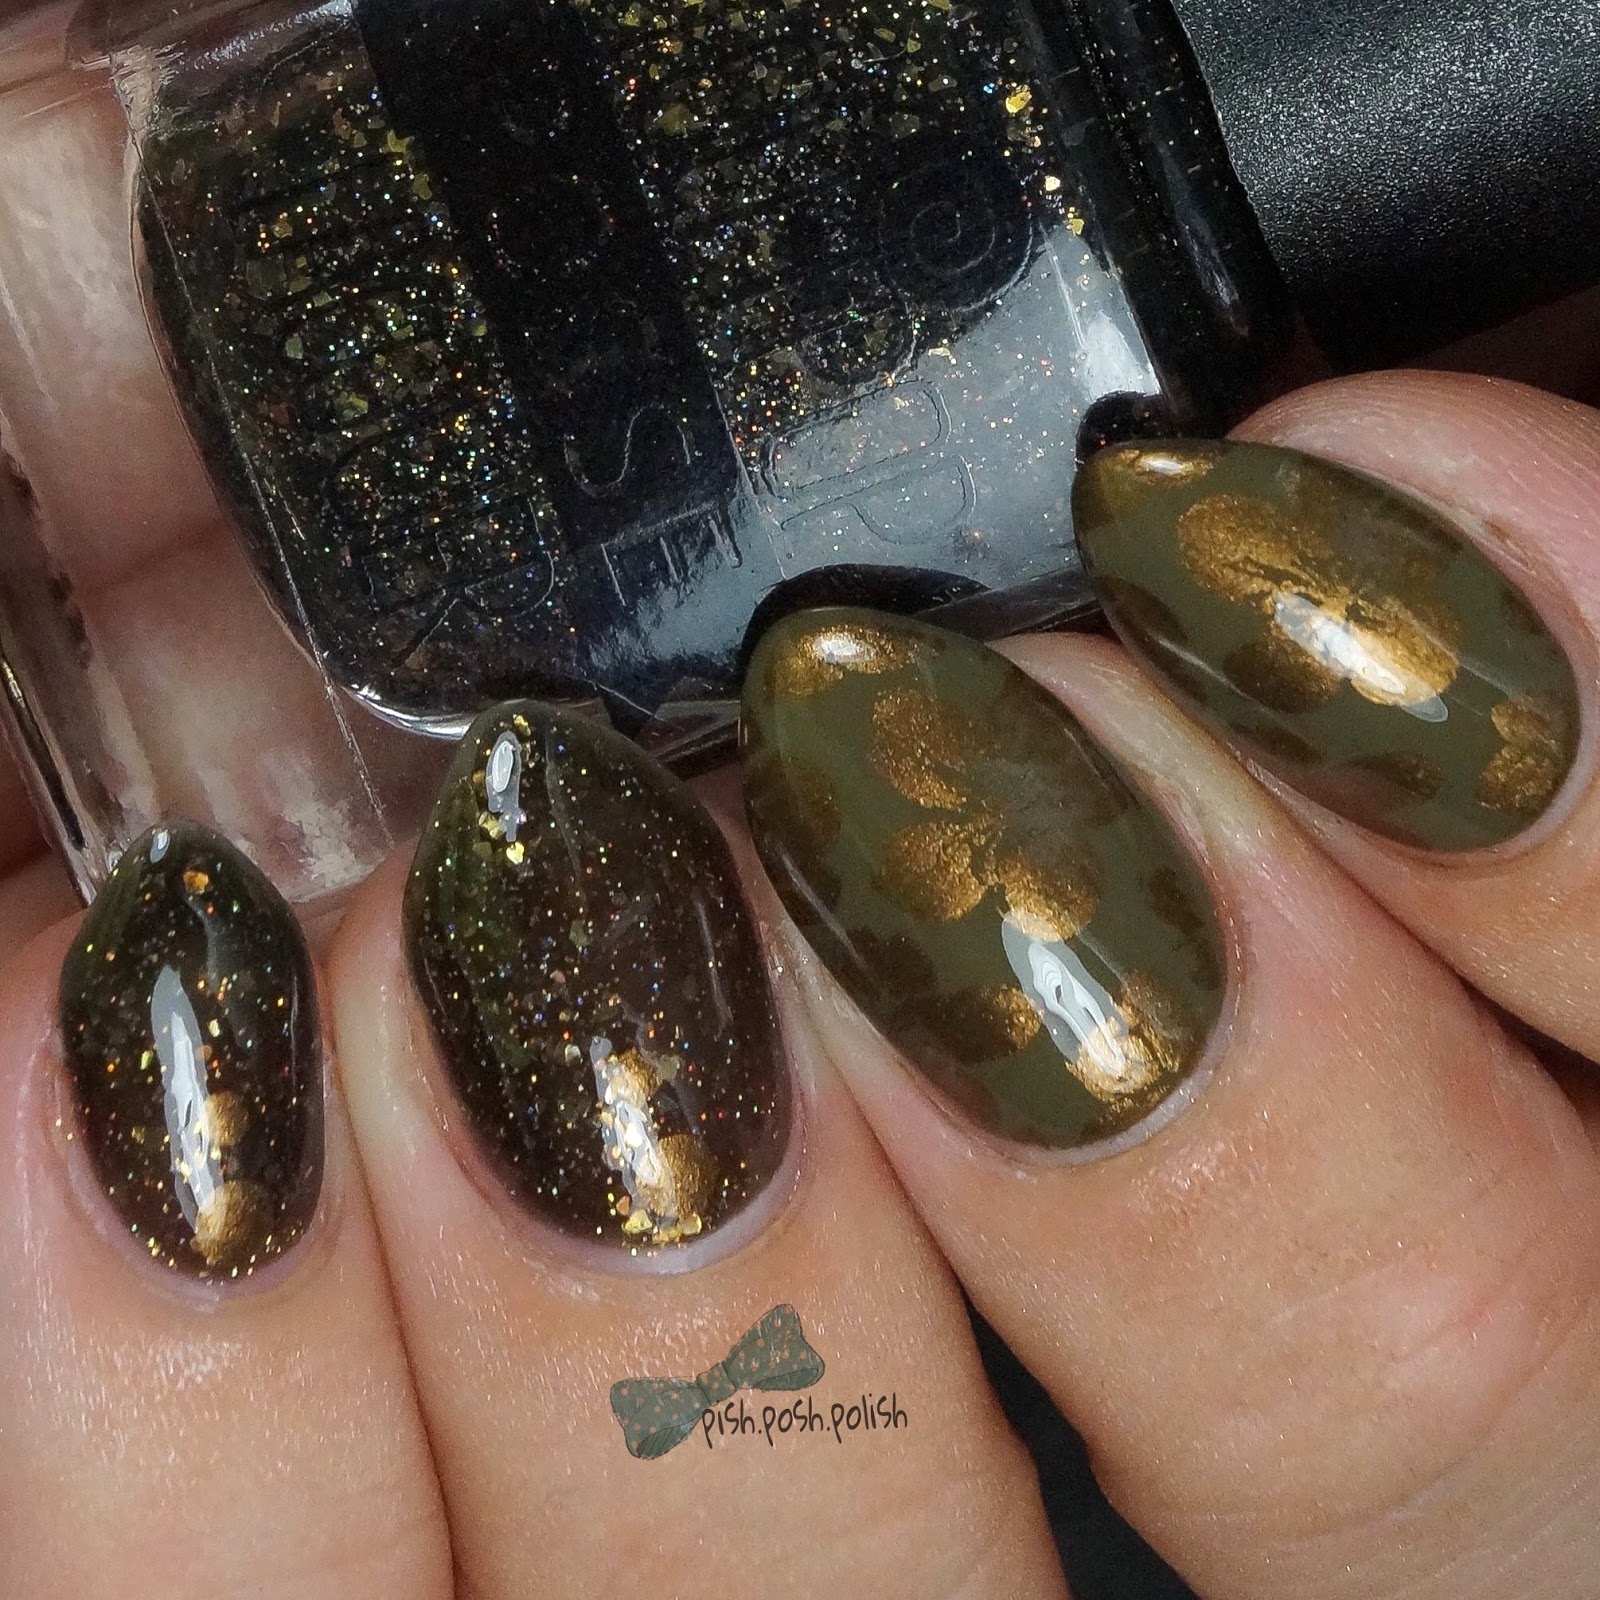
Nail Art: Green Fall Florals!


Hey y'all!Today on the blog I am sharing some more fall nail art with you. This time using deep, rich greens with a hint of sparkle.

I started with a base of Nail Envy to strengthen and protect my natural nails. Once that was dry, I went in with Sally Hansen Loden Green, from the Complete Salon Manicure line on my index and middle. Now, this color is a love it or hate it kind of color but I'm in the love it camp so I based this entire mani around it. Anyway, then I used Lollipop Posse Lacquer Inside My Head on my ring and pinkie fingers to give it some bling and sparkle. I am head over heels for Inside My Head - its a blackened green jelly base with scattered holo micro glitter and dark gold flakies all throughout it. STUNNING! Once my base colors were dry, I stamped Loden Green with M Polish Elizabethan and Uber Chic Beauty 4-03. I had considered doing leaves but that is very popular right now so I switched it up and went floral. I added a couple of dots on my ring and pinkie, also with Elizabethan. I sealed everything in with Essie Gel Setter and I wore this mani for 3 full days!

I was going to do a full review of Essie Gel Setter but I never wear my manis long enough to say whether its wear time is actually longer or not. Perhaps I can do it on my cindy hand? Would you want to read a review on it?

If you want to see a live version of this tutorial, click below to go to my Youtube channel!


What do you think of this mani? Do you like the "ugly" pretty colors?

Thanks for reading!


Want to see more? Click below to connect with me! 

Wednesday, July 1, 2015

My top 5 favorite indie polishes!

**Girly Bits Save Your Scissors was a gift and MPolish Pish Plashin' Around was a press sample**

Hey y'all! Today on the blog I have a very special post to share with you! First off, its a post sharing with you my top 5 all time favorite indie polishes and that alone is super exciting but its also a link up with a bunch of other bloggers that are sharing some of their favorites, too! Make sure to look at the bottom of this post for a link to see everyone's posts. Go see what their favorites are and show their blogs some love! 


Much like my top 5 mainstream polishes post, I had every intention of putting these in order, but unfortunately, it was hard enough to narrow down my top 5, and after that, I just couldn't put them in order. So in no particular order, keep reading to see my top 5 picks!

Delush Polish A Night At The Asylum 

My first pick for my top 5 indie polishes is definitely Delush Polish A Night At The Asylum. This polish is a jelly glitter polish that consists of a small circle and square glitters as well as some large holographic circle glitters suspended in a dark teal jelly base. This is 2 coats of ANATA with Seche Vite topcoat. I immediately had to have this polish after I saw swatches last fall, this polish is a part of the Delush Polish Scream Supreme collection. I do have to leave this one sitting upside down for a bit before using it as the glitter does tend to settle, but as long as I leave it upside down for a little while before using it, I don't have to fish for the glitter, it distributes beautifully on its own. This polish is still available from Delush Polish!


Shinespark Polish Radical Red 

The second polish in my top 5 is Radical Red by Shinespark Polish. This is from the 80's neons collection that released this spring and definitely one of the most beautiful neons I've ever seen. The color of Radical Red reminds me of the original China Glaze Flip Flop Fantasy though with a MUCH better formula. This is shown in two coats plus Seche Vite. This polish does dry to a matte finish like most neons, but a topcoat glosses it right up. My photo is almost color accurate but Radical Red is even brighter in person, it glows in the shade! I wish I had purchased the full size rather than the mini. This polish is still available from Shinespark Polish!


Girly Bits Save Your Scissors 

My third pick for top 5 indie polishes is Girly Bits Save Your Scissors. This polish is a lavender crelly polish with a ton of different colored glitters through out. The absolute best thing about this polish is its glitter displacement, absolutely ZERO settling. I don't even have to shake it or roll it before polishing. I do not have to manipulate the glitter placement either, it just glides onto the nail. This is two coats with Seche Vite topcoat. Just a stunning formula for a stunning polish. I was gifted this by my beautiful friend, Dancer during a polish swap. I need to see what other crellies Girly Bits has to offer because unfortunately, Save Your Scissors has been discontinued. :(


MPolish Pish Plashin' Around 

I wasn't sure if I should add in stamping polish to my top 5 indies but MPolish IS an indie brand, so I decided to go ahead. Obviously this one had to make it because 1. its blue and I adore blue polish and 2. its named after me! Please disregard my index finger, I stamped it funky, completely user error as you can see from the other fingers, this polish stamps fabulously. I have a full review on this polish in a previous post that you can find here. This is a perfect summer color for stamping, it picks up easily on the first try even with finely engraved images. Here is is pictured over China Glaze Inner Beauty with Seche Vite topcoat. This polish is still available from MPolish, though I think it is out of stock at the moment and will be restocked in coming weeks.

KBShimmer To Peach His Own 

The final polish to make it to my top 5 favorite indie polishes line up is KBShimmer To Peach His Own. This polish is best described as a nude leaning baby pink crelly polish with various glitters throughout. I actually purchased this one with a bit of trepidation because its not a color I tend to gravitate towards. I was completely in love with the swatches but I wasn't sure how it would look on me or if I would like it once I got it. I have to say that I was completely blown away when I first put this one on. This pic shows To Peach His Own in two coats plus topcoat. I love the various sized glitters in it and the way it looks against my skin. Its my go to polish to put on when I don't feel like doing nail art because it stands so well alone and makes me feel beautiful and classy when I wear it. I don't have to do any fishing for glitter with this polish nor do I have to leave it upside down before using it. The glitter displaces well on the nail with no extra effort. To Peach His Own is still available from KBShimmer. Quick...if you love crellies, GO BUY IT! You won't regret  it. 

And that completes my top 5 all time favorite indie polish line up! Did any of my favorites make your top 5? Don't forget to check out all the other posts this week featuring various bloggers' top 5 favorite indies as well! Just click on the link up below!! 

Thanks for reading!
Love, 
Pish 

**Want to see more? Follow me on Instagram to see more nail art and swatches!**

Monday, June 29, 2015

Holo gradient and stamping!

**nothing to disclose**

Hey y'all! Today on the blog I have some more holo nails to share with you. Its summertime in the Northern Hemisphere which means lots and lots of sun, what better time to wear ALL the holos???! 


I actually did these for #PPSANailChallenge that I'm doing for the month of June and the prompt was purple. I did this holo gradient and stamped over it. Keep reading after the break to see a brief explanation of how I did this mani! 

Car photo

Another car photo!

Mandatory Macro

So now that you've seen every angle possible of this mani, you might be wondering how I did it. I started with a dry base coat of Color Club Harp On It and sponged a gradient of Harp On It, Cloud Nine, and Jade Violeta over to create a subtle holo gradient across the nail. Once it was dry, I stamped with MPolish Dancing In The Streets and UberChic 3-02 and topcoated with Seche Vite. I love love love how it turned out. That is possibly the best macro shot I've ever taken. *drool* The holooooooo. 

What's your favorite holo polish? Any that I need? 

Thanks for reading! 
Love, 
Pish 

**Want to see more? Follow me on Instagram for more nail art and swatches!**


Thursday, March 26, 2015

Watermarble using M Polish!

***Nothing to disclose***


Hey y'all!


Today on the blog, I have a simple post for you showing these pink and nude watermarble nails. 


Watermarble using KBShimmer In Bare Form as a base and M Polish Annette for the marble.

Here's a picture showing what I used for this look:

Left to right: QTica nail growth stimulator, KBShimmer In Bare Form, M Polish Annette, Sally Hansen Clear'd For Takeoff, KBShimmer Clearly On Top

I started with 3 coats of KBShimmer In Bare Form as a base color for my watermarble. Once it had a few minutes to mostly dry, I placed liquid latex around my nail to protect my skin from the polish. Using M Polish Annette and a clear polish from Sally Hansen called Clear'd For Takeoff, I created the watermarble that you see above. Once it had dried for a few minutes, I added my favorite new topcoat: KBShimmer Clearly On Top. 

I was really happy with how this turned out, although it was cloudy that day so I wasn't able to capture the sparkle of In Bare Form which is always a bummer. Why is it always cloudy when I want to wear a holo?! 

What do you think of this look? Have you ever used clear polish for a watermarble? Which clear is your favorite for that technique?


Want to see more? Find me on INSTAGRAM to see more nail art and swatches!

Monday, March 9, 2015

Shinespark Polish, 90's Kid's Collection swatch and review: part 2

**purhased by me**

Hey y'all!

Today on the blog, I have the second half of the Shinespark Polish 90's Kid's Collection review with swatches. I am so excited to show you this portion of the collection as its my favorite! 


Shinespark Polish 90's Kid's Collection (starting at the top and going clockwise): Ballerina Bunny, Rainbow Chaser, Markie, Peekaboo, Dancing Dolphins, and Max Splash)

Take a look at Peekaboo, a luscious vivid green neon jelly with subtle shimmer. This polish was so exciting to apply, the formula was amazingly smooth and easy to apply. I was reminiscing of childhood days and watching Nickelodeon where kids went on TV just to get slimed! Shown here in 3 coats plus topcoat, this polish is unique to my collection. Can you believe how bright it is without a white base?! 


Peekaboo, 3 coats plus topcoat

Peekaboo with OPI Matte topcoat

Next up is Dancing Dolphins, a beautiful ocean-y neon blue jelly with subtle shimmer. This is one of my two absolute favorites from this collection. The color is just to die for! I had no problems with the application of this polish, the formula is identical to the rest of the collection. 

Dancing Dolphins, 3 coats plus topcoat

Dancing Dolphins with OPI Matte topcoat

The final polish of the Shinespark Polish 90's Kid's Collection is my absolute favorite. Max Splash is a vivid orchid purple neon jelly with subtle shimmer throughout. The formula was exactly as good on this one as it is on all of the others in this collection. I love it when I fall in love with a color and a formula in a polish. I didn't want to take this one off. Check out how gorgeous it is matted! 


Max Splash, 3 coats with topcoat


Max Splash with OPI Matte topcoat 


Let me show you some nail art I did with these polishes. Probably one of my favorite manis to date was the one I did using Max Splash from Shinespark Polish and Snowberry from MPolish. I went back and used some acrylic craft paints and a small detail brush that I got from Michael's Craft Store to do the roses. 

Shinespark Max Splash stamped with MPolish Snowberry

The other mani I did with the 90's Kid's Collection was one inspired by the collection itself. The 90's Kid's Collection was inspired by the work of Lisa Frank so I felt as though I had to do an entire mani with this collection a la Lisa Frank. I have an entire blog post dedicated to this mani which will be coming out sometime later this week so keep an eye out for that if you want to see how I created it. 

Lisa Frank inspired mani using the entire Shinespark Polish 90's Kid's Collection

That concludes my swatch and review of the Shinespark Polish 90's Kid's Collection. Again, I just can't say enough good things about this collection. I am looking forward to other things to come from this indie brand. If you're interested in purchasing this collection, you can find them on her website HERE. You can also follow news and new releases from Shinespark Polish on her INSTAGRAM.

Will you be wearing neons this summer?


Saturday, February 21, 2015

Stamping with MPolish Snowberry!

Hey y'all!

Tonight on the blog I have some simple stamping over a jelly polish base. 


Here's a picture of the polishes and stamping plate I used to create this look:

Left to right: Essie protein base, Mango Bunny Fern Bunny, MPolish Snowberry, Seche Vite
Front: Cici&Sisi plate #3

I started as usual with my base coat to protect my nail and then followed that up with painting Fern Bunny on all of my nails. I waited a few minutes for that to mostly dry and then moved on to the stamping portion. I decided to keep with the theme of the polish which felt very forest-y to me so I chose a leaf pattern to stamp over the base color.

Leaf image from Cici&Sisi plate #3

I used MPolish Snowberry for the leave image on my nails. You can find this awesome stamping polish HERE

I waited for the stamping images to dry for a few minutes and then top coated with Seche Vite. Here's a macro to show the details of the stamping. I am thrilled with the results.


What is your favorite way to use nail stamping? 


MPolish watermarble

Hey y'all! 

Today on the blog, I have these glorious watermarble nails brought to you by MPolish. MPolish is an up and coming indie polish brand that specializes in FIVE free stamping polish. 


I purchased the full spring line on the date of launch, February 17th and she sold out minutes later! Keep reading and you'll see why! 

Colors (left to right): Apricot Delight, Starflower, Apple Blossom, Sweet Clover, Snowberry, and Bells Of Ireland. 


The spring line of MPolish includes 6 iridescent colors that work best when stamped (or watermarbled in this case)   over a darker color. They are beautiful over almost any color but when you put them over a darker base, they almost glow. 

(I am loving the idea of taking a macro this way, I totally borrowed the idea from my friend Manna over at Manna's Manis. Go check her out!)


Here's a picture of the polishes I used for this marble:

Shown here (left to right): Essie protein base, Zoya Sailor, MPolish Apple Blossom, Snowberry, and Starflower, Seche Vite 


Pictures do not do these polishes justice, you really must see them in person. I cannot stop staring at my nails! 

Even though they're stamping polishes, I had to try watermarbling with them. My thought process went something like: I watermarble with the same mainstream polishes that I use for stamping > MPolish is a stamping polish so it's highly pigmented > let's give this a whirl. 


Isn't it beautiful? 

Now, I won't say that I had an easy time getting them to spread at first but I was using cold tap water. It's typically easier to get polish to spread in room temperature water. I will be trying this with them again using room temp water so I can report on their true watermarbling abilities. 
*****UPDATE: I tried marbling with them again with room temperature water and they spread like a dream!*****


What I can say is that these polishes are unlike any others I have in my collection of over 300 polishes both in quality and distinctive finish on the nail. You will not be disappointed in MPolish and you definitely need the whole collection even if you're not an avid stamper as they can be used for other nail art techniques! 

As I stated before, MPolish sold out during her launch, but she is currently accepting pre-orders for a second release of the full spring line. You can place your order HERE.

What polishes are you most looking forward to for the spring? Did you manage to snatch up some MPolish?

**these polishes were purchased by me. The review aspect of this post express opinions that are solely my own.**