Monday, June 29, 2015

Holo gradient and stamping!

**nothing to disclose**

Hey y'all! Today on the blog I have some more holo nails to share with you. Its summertime in the Northern Hemisphere which means lots and lots of sun, what better time to wear ALL the holos???! 


I actually did these for #PPSANailChallenge that I'm doing for the month of June and the prompt was purple. I did this holo gradient and stamped over it. Keep reading after the break to see a brief explanation of how I did this mani! 

Car photo

Another car photo!

Mandatory Macro

So now that you've seen every angle possible of this mani, you might be wondering how I did it. I started with a dry base coat of Color Club Harp On It and sponged a gradient of Harp On It, Cloud Nine, and Jade Violeta over to create a subtle holo gradient across the nail. Once it was dry, I stamped with MPolish Dancing In The Streets and UberChic 3-02 and topcoated with Seche Vite. I love love love how it turned out. That is possibly the best macro shot I've ever taken. *drool* The holooooooo. 

What's your favorite holo polish? Any that I need? 

Thanks for reading! 
Love, 
Pish 

**Want to see more? Follow me on Instagram for more nail art and swatches!**


Thursday, June 25, 2015

Lorelei Lacquer Neon Sunset Collection Part 2!

**Press Sample**


Hey y'all! Today on the blog I have the second half of the upcoming Neon Sunset Collection by Lorelei Lacquer to share with you! As I stated in yesterday's post, this collection consists of 9 polishes: 7 holos and 2 crellies so I split it up into 2 installments. You can see part one here. Keep reading after the break to see individual swatches! 

Top Left: Pretty Mama, Top Right: Key Largo, Bottom Left: Montego, Bottom Right: Kokomo 


Lorelei Lacquer Pretty Mama, $9 full size, $5 mini 
Carrying on from yesterday, the 6th polish I swatched from the Neon Sunset Collection was Pretty Mama which if you know me, you know is another favorite! I do love a good crelly and this one is GOOD! This polish can best be described as a light baby pink crelly with blue and pink matte hex glitters with blue and pink shimmery microflakies throughout. The formula was really nice on this polish, its shown here in 2 coats plus topcoat. I likely should have done a third coat for this one like I did I Wanna Take You because I still have slight VNL but it didn't bother me when I swatched it. The first coat was a little streaky as is typical with this type of crelly polish but the second coat self leveled and just turned out lovely. I really like the addition of the microflakies to this polish, it almost gives it a lavender tint.


Macro of Pretty Mama 

Lorelei Lacquer Key Largo, $10 full size, $6 mini

The seventh polish from the collection is Key Largo, a goldenrod shade of orangey yellow that reminds me of marigolds and mangoes. Yeah, I was kind of all over the place when I was swatching! All the while singing, "Key Largo, Montego, baby why don't we go..." This polish isn't really my favorite shade because I have a hard time wearing oranges and yellows with my skin tone but that is really a personal preference issue. The polish itself has a wonderful 2 coat formula. It wasn't streaky and self leveled really nicely on the second coat. Its shown here in 2 coats plus Seche Vite topcoat. I really love the subtle scatter of holo with this color.


Macro of Key Largo 

Lorelei Lacquer Montego, $10 full size, $6 mini 

The eighth polish I swatched from Lorelei Lacquer was Montego. This polish is a really beautiful vibrant orchid shade with subtle holographic micro glitter throughout. This is one of the ones that I was most excited to swatch when I saw it in the bottle and it turned out to be just as beautiful on the nail. The formula and application were good for Montego, shown here in 2 coats plus Seche Vite topcoat. This one wasn't streaky and self leveled nicely on the second coat. I love the subtle holo in it, and like Bermuda, I think it will make a great base for nail art.

Macro of Montego 

Lorelei Lacquer Kokomo, $10 full size, $6 mini 
Feast your eyes on Kokomo, the final polish in the Neon Sunset collection by Lorelei Lacquer. Let me be really upfront and tell y'all that I really wasn't looking forward to swatching this one because I don't wear brown polish but...oh my how wrong I was. This is one of my 4 faves from the collection and such a great polish. I think that if you're going to wear brown in the summer, Kokomo is the way to do it. This polish had the strongest holo of the entire collection and the formula was like butter. Shown here in 2 coats plus topcoat, I really feel like this had the absolute best application of the collection. I was telling a friend about it and referred to it as holographic chocolate. :'D No streakiness, no issues with pigment, just perfection. I already have plans for this beauty in some nail art.


Macro of Kokomo

And there you have it, the second installment of the Neon Sunset Collection by Lorelei Lacquer. Overall thoughts for the collection: As with the first half of this collection, I really enjoy the variety of colors and finishes. I think this collection has something for everyone and has an overall great formulation. The Neon Sunset Collection launches Friday, June 26th at 6pm CT and retails for $80 for the full sized set and $50 for the mini sized set. You can grab them from loreleilacquer.com.

Which one is your favorite?

Thanks for reading!
Love,
Pish

**I was provided these polishes free of charge in exchange for my swatch photos and HONEST review. All opinions expressed in this post are my own.**


Wednesday, June 24, 2015

Lorelei Lacquer Neon Sunset Collection Part 1!

***Press Sample***

Hey y'all! Today on the blog I have a swatch a review for an upcoming collection by Lorelei Lacquer called The Neon Sunset Collection. This collection was super fun to swatch and has some really great variety. The collection consists of 9 polishes: 7 holos and 2 crellies so I've split the collection up into 2 posts. Make sure you catch the second installment tomorrow! Keep reading after the break to see individual swatches!


Top Left: Aruba, Top Right: Jamaica, Middle: I Wanna Take You, Bottom Left: Bermuda, Bottom Right: Bahama 

Image Credit: Google Images 
This collection is cleverly named from the lyrics of the Beach Boys song Kokomo and makes it impossible to paint your nails with any of them without singing the song in your head all day. ITS STILL IN MY HEAD! :'D

Lorelei Lacquer Aruba, $10 full size, $6 mini


The first polish I swatched from the collection is called Aruba. Its best described as a fusion of jungle green and teal and has a subtle scatter of holographic micro glitter throughout. I used two coats in the swatch photo along with Seche Vite topcoat to make it shiny. Each of the polishes in the collection dry semi matte, so you'll more than likely want a topcoat. The formula was a little thick but not difficult to work with and self leveled on its own. I did have a few tiny bits of pigment that didn't quite mix all the way in this one but I let the maker know for future batches. I didn't feel like this was a huge problem in the application. The holo is subtle but really beautiful in the sun! 


Macro of Aruba 

Lorelei Lacquer Jamaica, $10 full size, $6 mini
The second polish I swatched from the collection is Jamaica. This is such a summer polish, super bright, sunshiny yellow with a scatter of subtle holographic micro glitter throughout. I was surprised with the ease of application on this one as yellow is usually a tricky color to apply. The swatch photo is two coats with Seche Vite topcoat. The first coat was a little streaky but the second coat brought the opacity and self leveling. No issues with unmixed pigment in Jamaica and it was an overall beautiful polish! 


Macro of Jamaica 
Lorelei Lacquer I Wanna Take You, $9 full size, $5 mini 

The third polish I swatched from Lorelei Lacquer was I Wanna Take You. Please just take a minute and admire it. I'll give you a minute. You ready? Okay. 

So this one is my absolute favorite from the collection. It has a mix of glitter - turquoise and teal matte square glitters and magenta flakies all suspended in a white crelly base. As is the case with most white crellies, I did have to use 3 coats for complete opacity. You could probably get away with 2 but I still had slight VNL with 2 so I added a third. The application is a little streaky on the first coat but self levels on the second and third. I didn't have any problems with glitter settling, I didn't have to shake or roll before starting the swatch. The glitter dispersed easily across my nail with no manipulating and the glitters smoothed over well with topcoat. Ugh...I just love it. I wanted to leave it on and stop the swatching right then and there. I really felt like the flakies in the crelly base set it apart from any other crelly I have.

Macro of I Wanna Take You

Lorelei Lacquer Bermuda, $10 full size, $6 mini

The fourth polish I swatched was Bermuda, also a favorite from the collection. Its so my kind of color...so BLUE! This polish is best described as a royal blue, leaning blurple color with scattered holo glitter throughout. I had no issues with application - its shown here in 2 coats plus Seche Vite topcoat. No unmixed pigment, no streakiness, and it self leveled very well. The holo is a bit stronger in this one but still a subtle scatter across the nail. This will make a great base for nail art. I can't wait to play with it more!


Macro of Bermuda

Lorelei Lacquer Bahama, $10 full size, $6 mini
The fifth polish I swatched in the Neon Sunset collection was Bahama. Bahama is a true coral, bright and summery with a subtle scatter of holographic micro glitter throughout. The application was nice on this one as well, though I did have a tiny bit of unmixed pigment like I had in Aruba but it didn't seem to change the application at all. The swatch picture shows two coats with Seche Vite topcoat. I really want to put this one on my toes, it made my hands look so tan! 


Macro of Bahama 


Overall thoughts from the first half of the collection: I adore this collection. I think that it is a unique mix from holo, to crelly, to flakies and the names of the polishes are so cute! The formula was nice on all of them, save for the occasional bit of pigment that was easily moved out of the way with the polish brush. This collection is a nice departure from all the traditional neon collections we have been seeing so far for 2015. As a consumer, I plan to pick up full sized versions of I Wanna Take You and Bermuda because I think they are must haves!

This collection launches Friday, June 26th at 6pm CT over on loreleilacquer.com. The set includes 9 polishes and retails for $80 for the full sized set and $50 for the mini set.

Will you be picking any of these up? Which is your favorite?

Thanks for reading!
Love,
Pish

**I was provided these polishes free of charge in exchange for my swatch photos and HONEST review. All opinions expressed in this post are my own.**


Simple dotted flower nail art!

**This polish was a gift**


Hey y'all! Today on the blog I have a super simple post to share with you to share some nail art that I did. Read after the break for a simple explanation of how I did these nails!


I started with a base of Pahlish Stars at Rest as my base, which was a gift from my super sweet friend, Dancer. She knows how I feel about blue and crellies and she said that this just spoke to her when she saw it so she had to get it for me! She was right, I love it! Though I do wish I had set it upside down a while before using it as you can see that the glitter has settled pretty badly. You live and learn, right? So anyway, I did two coats of Stars at Rest and gave it a few minutes to dry. Then I used a dotting tool and some acrylic paints to dot on the flowers. I topped everything with Seche Vite. 

To be honest, I did not like this mani. Though the flowers matched the color of the glitter in the crelly, I felt that something was just off. I did wear it for a couple of days to see if it would grow on me but it didn't. Still, I did feel like the flowers turned out well! What do you think of this mani? What is your favorite simple, go to nail art technique? 

Thanks for reading! 
Love, 
Pish 

**Want to see more? Follow me on Instagram for more nail art and swatches!**

Monday, June 22, 2015

My top 5 mainstream polishes!

**nothing to disclose, I purchased all of these polishes myself.**

Hey y'all! Today on the blog I am going to share with you my top 5 all time favorite mainstream polishes! Keep reading after the break to see what my top picks are! 


When I sat down to pick my top 5 ever mainstream polishes, I had every plan of putting them in order but now sitting down to write about them, I don't think I can! There are a few things that these polishes have in common. First and foremost, they all have perfect formulas, a couple of them are one coaters, the others are two easy, thin coats. Let me show them to you, in no particular order!  


Sinful Colors Tempest 

The first of my top 5 is Sinful Colors Tempest. This polish is every purple lovers dream. Shown here in two thin coats and Seche Vite topcoat, this polish can best be described as a dusty, cool toned purple. It dries to a glossy finish on its own but I always add topcoat. This polish is still available from Sinful Colors, I found mine at Walgreen's.


Color Club Harp On It 

The second of my top 5 favorite polishes to make the list is Color Club Harp On It. What can be said about this polish that it doesn't say for itself?! Shown here in two thin coats and Seche Vite topcoat, this polish is a VERY strong linear silver holographic polish. The polish itself is a little thick but it goes on easily and is easy to manipulate on the nail without becoming streaky. It dries to a demi matte finish on its own. This polish is still available from Amazon.


Zoya Sailor 

The third polish to make my top 5 is Zoya Sailor. This is definitely up there on the list and may actually be one of my favorite polishes in my entire collection, indie polish included. This is ONE coat of Zoya Sailor with Seche Vite topcoat. This polish dries to a high gloss finish on its own and can best be described as a rich navy blue color. I cannot say enough good things about this polish, I bought it at full price upon a friend's recommendation and absolutely will again once I run out. Sailor is still available from Zoya.


Zoya Tomoko 

My fourth top 5 pick is another Zoya polish and another that I bought at full price upon a friend's recommendation. This is one of the few polishes in my collection for which I own multiple backups. Zoya Tomoko can best be described as a champagne gold textured glitter polish. This is two coats with no topcoat to preserve the texture, but you could absolutely add a coat or two of topcoat and it would smooth it out. This polish is one of Zoya's original pixie dusts and dries to a demi matte finish on the nail. One of my favorite things about the Zoya pixie dusts is the dry time - this dries on its own to the touch in about 5 minutes. I noticed after I took the photo that there was a smudge of Tomoko on the lid of the bottle. I decided not to take another photo because this shows how much I love this polish and how often I use it. Its debatable whether or not this polish and the other pixie dusts will remain available through Zoya's website, they are no longer available in stores. Zoya themselves announced the discontinuation of their pixie dusts but they are currently available on their website, perhaps only while supplies last.


Sally Hansen Pacific Blue (original formula)

Okay so, remember how I said I didn't think I could pick an absolute favorite? Well, looking at Pacific Blue now changes my mind. Again. I'm a woman, so that's allowed. :D Ahhhh...how do I love thee, Pacific Blue, let me count the ways. First off, this is ONE coat of PB. One easy, dreamy, creamy, magnificent coat. This polish is a bright cornflower blue that dries to a high gloss finish on its own - though I am wearing it here with topcoat. This polish works well for many applications - including stamping and watermarbling. Why the hell Sally Hansen changed the formula of this perfect polish is beyond me. This is another of the very few polishes that I own backups of and I'm sad because the bottle I'm holding in my hand is almost gone. WAAAAAAHHHHHH! Pour one out for my homie...Pacific Blue, Original Formula. 


So there we have it, my top 5 all time favorite mainstream polishes. What are your picks? Do we share any favorites? 

Thanks for reading! 
Love, 
Pish 

**Want to see more? Follow me on Instagram for more swatches and nail art!**


Friday, June 19, 2015

Bright and sparkly watermarble!

**nothing to disclose**


Hey y'all! Today on the blog I have these super sparkly neon watermarble nails to share with you. I'm sort of just documenting them for shiggles because I sort of just did them for shiggles. So keep reading to see these fun and sparkly nails I did! 


I started with two coats of Color Club Harp On It as my base on all nails. Once that was dry, I used Funky Fingers Power Play, Limelight, and Kingston, along with Sally Hansen Pacific Blue and Color Club Harp On It in my watermarble. I did my usual technique along with my semi new watermarble tool from Whatsup Nails to get the right design which in this case was meant to be random and different. I topped everything with Seche Vite fast dry topcoat. Here's another look:


What do you think of this mani? Do you own the Color Club Halo Hues? I just got them and love them! 

Thanks for reading! 
Love, 
Pish 

Want to see more? Follow me on Instagram to see more nail art and swatches! 

Wednesday, June 17, 2015

Bestie Twin Nails with @lacquerexpression!

**nothing to disclose**


Hey y'all! Today on the blog I have some bestie twin nails to share with you. I was lucky enough to be able to do twin nails with the incredibly talented @lacquerexpression and I am so pleased with how they turned out! We were inspired by @kellytattoo over on Instagram for this mani. Take a look at how they turned out!


Let me show you a shot of hers alone, aren't they gorgeous? I want to have a hand pose like her when I grow up! So soft, delicate, and professional! 


Photo credit: +LacquerExpression 


And here's the solo shot of mine, read past the break to see how I created this look:


I started with two coats of Color Club Harp On It as my base. Once it dried, I used 4 colors (Ballerina Bunny, Markie, Dancing Dolphins, and Max Splash) from the Shinespark Polish 90's Kids neon jellies to make stripes down my nails. I overlapped them some to make them blend together to create a sort of gradient effect. Once that was dry, I stamped over the entire nail with UberChic Beauty plate 1-01 and sealed everything in with Seche Vite fast dry topcoat. I really loved the end result except I never had a chance to get a sun shot of these so that you could see the sparkle of Harp On It under those jellies. I do have a macro to show you in artificial lighting though! Check it out:


And that's it for this edition of bestie twin nails! I am always up for new partners, because bestie twin nails really pushes me to become better! What do you think of this mani? 

Thanks for reading! 
Love, 
Pish 

Want to see more? Follow me on Instagram to see more nail art and swatches!


Monday, June 15, 2015

Remember Rowan Tribute

**nothing to disclose**


Hey y'all, today on the blog I have a very special tribute mani to share with you. A handful (around 60 total) of my nail friends and I got together to create a remembrance collaboration to celebrate the birth of a beautiful baby girl named Rowan. A dear friend of ours in the nail community lost her baby girl at birth a year ago so we wanted to pull together to honor and celebrate Rowan on her birthday June 12. Sinful Colors Tempest has been deemed "Rowan's purple" by some of us so that's what a majority of the manis started out with. Rowan's mommy says that butterflies were for Rowan as well, so we incorporated butterflies into all of our manis. Let me show you mine:


#rememberrowan

I started with a base of Sinful Colors Tempest on all of my nails and allowed it to dry. Once that was dry, I used my UberChic Beauty plate 3-01 for the leaf and butterfly patterns. I stamped the leaf pattern with M Polish Snowberry and then did the butterflies with reverse stamping and filled them in with various acrylic paints. The glitter gradient on my index and pinkie was done with OPI Pink, Yet Lavender. I used the same glitter for a bit of glitter placement on my middle finger. Once I was finished, I topped everything with Seche Vite fast dry topcoat. 

You can see the other manis created for this collab tribute by searching the hashtag #rememberrowan on Instagram and you can see the original flipagram created by +Carmen Ineedamani HERE. We love you BeautifulDreamer, and we will never, ever forget to remember Rowan. Fly high, sweet baby. 

Thanks for reading. 
Love, 
Pish 

Want to see more? Follow me on Instagram to see more nail art and swatches.

Friday, June 12, 2015

Monthly mani swap!

**nothing to disclose**

Hey y'all! 

Today on the blog, I have my monthly mani swap to share with you. I adore how these turned out! I was paired with @crooked_mani over on Instagram. If you're not following her, you totally should be! 


Originals on the left, recreations on the right. <3

Right away when I was paired with her, I knew that I would choose her neon lead light mani because hello? Isn't is perfection? I love that she chose a bright neon mani to recreate as well. Great minds! Here's a solo shot of mine:

UberChic Beauty stamping plate and Shinespark Polish 90's Kids neon jellies 

I started with a white base of Orly White Tips and stamped over it with Zoya Willa using UberChic plate 3-03. I topcoated with Seche Vite and allowed it to dry to protect my stamping from smearing. Once it was dry, I set in with my jellies and a tiny dotting tool and carefully filled in the image with different colors. I only did the four nails you see here and it took me just over an hour! Worth it! I topcoated again to protect the design. My only regret is that I didn't use a blacker polish for stamping. My go to, holy grail black stamping polish is by Funky Fingers, called Black Knight. I had run out but wanted to get my swap mani done. Next time I do a design like this, I will definitely use the Black Knight.

I so love doing mani swaps and look forward to doing so monthly. Do you like mani swaps? I feel like they better me as a nail artist and push me to do things I wouldn't have normally tried otherwise. 

Thank you for reading! 
Love, 
Pish 

Want to see more? Follow me on Instagram for more nail art and swatches! 


Wednesday, June 10, 2015

Nail It! Magazine update!

Hey y'all!

Just popping in to give an update on a previous post I made about Nail It! Magazine. Here's the original post: Nail It! Magazine submissions!

Nail It! Magazine regularly accepts submissions from nail artists to feature in the magazine and one of the prompts they were looking for recently was NEON for the July/August 2015 issue. I submitted two, this one being my favorite:


And mine was featured! I am a published nail artist in Nail It! Magazine, y'all! I am so super excited and thrilled, and giddy, and.....BURSTING with all the happy things on the inside. It has renewed my love for nail art to feel validated in this community and business. To know that I am not only doing this for my own personal happiness but that other people out there think I'm pretty good at it! Shoutout to the maker of Shinespark Polish for making the beautiful neons that I used for this mani. <3


So that's it, just wanted to share my excitement as I said in my previous post on this subject that I would update you guys. I couldn't be happier and I plan to churn out some kickass manis to make up for the time I've been gone.

Have you ever been featured somewhere that you had always dreamed of? What's your big aspiration?

Thanks for reading!
Love,
Pish

Monday, June 8, 2015

Delush Polish Life's A Beach swatch and review

**nothing to disclose**

Hey y'all!

Today on the blog, I have a swatch and review of 3 polishes from the Delush Polish Life's A Beach collection. This collection launched on May 29th, 2015 and consists of 7 polishes, all neon crellies! I wanted the whole collection because, well, I'm an addict! The first step in recovery is admitting you have a problem, amirite!? But alas, I knew that I wouldn't wear all seven shades so I picked my top 3. Keep reading after the break to see some swatches! 

Left to right: Babe Watch, Turn Over A New Reef, All Twerk and No Play


Top: All Twerk and No Play, bottom left: Babe Watch, bottom right: Turn Over A New Reef

I started with what I thought was going to be my least favorite out of the 3 I ordered. Not least favorite like I didn't like it but when I swatch polishes, I go in order from the bottom to my very favorite so that I get to wear my most favorite in the end. Anyone else do that? Just me? Oooookay. Moving on. 

So I started with All Twerk and No Play. I am going to be 100% honest with you and tell you that I bought this polish for the name alone. I do NOT love orange nail polish, particularly neon orange polish but I had to have it for that adorable name. Well, the joke is on me because I think this one wound up being my favorite. This polish is an orange leaning red crelly polish with almost iridescent pale blue hex glitter in varying sizes throughout. The glitter reminds me of seashells. Its shown below in two easy coats, no white undie, and Seche Vite topcoat. Look how gloriously bright...my camera almost exploded...

All Twerk and No Play

The next one I swatched is Babe Watch, a traditional hot neon pink base with bright blue circle glitters in varying sizes throughout and some large blue holographic circle glitters as well. As with All Twerk, this polish went on smoothly in two thin coats, no white undie, and Seche Vite topcoat. 

Babe Watch

The final polish I swatched is Turn Over A New Reef, another super cute name! This polish is a bright blue crelly polish with lime green micro glitter, square glitter, and hex glitter throughout. As with the others, I did two thin coats, no white undie, and Seche Vite topcoat. 

Turn Over A New Reef 

So what are my thoughts on the polishes that I own from this collection? First of all I will say that neons are always popular, somewhat overdone, and kinda basic, so when I saw this collection, it caught my eye because its different than the rest. I can tell that the maker put lots of thought into planning this collection out from the formula, to the colors, to the names. All 3 polishes that I purchased have a lovely formula with good glitter coverage. I didn't have to do any fishing, these are jam packed with glitter but not thick on the brush. I love that they don't need a white undie, because really, who has time for that extra step?

All in all, I think this is a great collection that stands out in a sea of neons for summer 2015. My only regret is that I didn't buy all 7. And who knows? I may just go back and get the rest!

Did you pick any polishes up from the Life's A Beach collection? What did you think of them? What's your favorite line of neons?

Love,
Pish

**I purchased these polishes myself and am in no way affiliated with Delush Polish. All opinions expressed in this post are my own.**

Want to see more? Follow me on Instagram for more swatches and nail art!


Saturday, June 6, 2015

FormulaX Infinite Ombré looks and review!

Hey y'all!

Let's just start off by saying, yes. It's been a bit since I have written. Life got all hectic and crazy so blogging took a backseat to everything else. I'm going to recommit myself to at least 1, hopefully 2 posts a week again so stay tuned! 

Today on the blog I have a review of the FormulaX Infinite Ombré kit. I was provided this kit by Preen.Me as a part of their Preen VIP program. The kit includes a base color called Platinum Prime and four colors that have a jelly-like finish: Boundless Berry, Timeless Teal, Infinite Indigo, and Limitless Lemon. 


Image credit: Google Images

These polishes are highly blend-able, making gradient and ombré looks easier. You can blend them with the brush out of the bottle, with a sponge, or with a nail art brush. I did 3 separate looks with these polishes to show how they work in different applications. Let me show you what I did. 


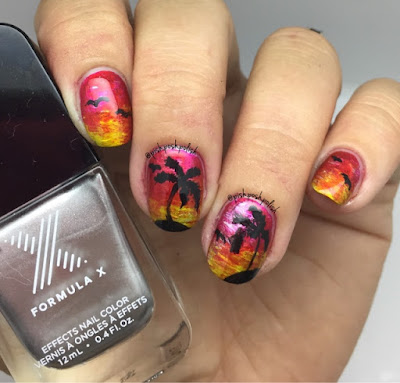
My first look is a sunset gradient with some handpainted palm trees. For this look I used the base Platinum Prime and two colors Boundless Berry and Limitless Lemon. Once the base was down and dry (one coat), I dabbed a little Boundless Berry towards my cuticle and a little Limitless Lemon towards the tip of my nail. While the polishes were still wet, I blended them messily with a fan brush. I made 3 passes to achieve this look. I gave it a few minutes to dry and then painted on the palm trees with acrylic paint. Once everything was dry, I topcoated with Seche Vite. 


The second look is a sort of stained glass , quatrefoil look using the base and all four colors. Once I had laid down the base - Platinum Prime, I used a latex free makeup sponge to dab all four colors onto my nail. I made 3 passes for complete opacity. I topcoated and allowed everything to dry. Then I went back in with my stamping plate (UberChic Beauty  3-02) and the silver base to stamp the quatrefoil design on all of my nails. I was pleased with how crisply the base stamped! I topcoated with Seche Vite.


The third look is a watermarble using all four colors in the kit over the silver base. This one was my favorite and the most surprising. Since the polishes are meant to easily blend, I expected them to get muddy when I was trying to draw the design. As you can see, they came out very neat and crisp. I started with a dry base of Platinum Prime and dropped the colors into room temp water until I had enough rings. I drew in the flower design with my watermarble tool, dipped my finger, removed the excess polish, and removed my finger. I topcoated with Seche Vite. 


Now for the review portion! I was pleasantly surprised with how these polishes performed. I have been doing gradients and ombres for over a year now, so when I saw this kit, I thought it was a tad gimmicky. Most polishes will blend just the same as these do, even if they're not part of an "ombré" kit. If you've got a silver polish and some colored jelly polishes, you basically already own this kit. Take that with a grain of salt though, as I own over 300 polishes. LOL 

That being said, these polishes all have a beautiful formula and are very vibrant when used over the silver base. They do blend very nicely on the nail and I like how versatile they are to use. If you were considering this set or a set like this, I say go for it, as I can see getting a lot of use out of it if you don't already own something similar. 

Thank you to Preen.me, FormulaX, and Sephora for teaming up and providing these polishes to bloggers and Instagrammers for looks and review. They were fun to play with! 

Want to see more? Follow me on Instagram for more nail art and swatches.